Insulation Requirement Calculator
What R-value does your zone need? This insulation requirement calculator finds minimums and estimates batts, blown-in, or spray foam for walls and attics.
Last updated:
Reviewed by Doc. dr. sc. Bojan Milovanović, dipl. ing. građ., PhD, Civil Engineering (FCE, University of Zagreb)
Find your zone at energy.gov/energysaver. Zones 1-2 are the Deep South; 6-7 are the northern US and Alaska.
Where the insulation will be installed. Each area has different R-value minimums.
Total surface area to insulate, not floor area.
Batts for new construction cavities, blown-in for retrofits and attics, spray foam for maximum R per inch.
Cavity depth limits achievable R-value for batts and blown-in. Select "Attic" for open attic floors.
How This Is Calculated
Required R-value = IECC 2021 Table R402.1.3 lookup by climate zone and application area. Achievable R-value = R-value per inch × cavity depth (inches). Batts needed = area ÷ 32 sq ft per batt. Blown-in bags = area × (required R ÷ 13) ÷ coverage per bag. Spray foam board feet = area × (required R ÷ R per inch). Estimated cost = area × cost per sq ft.
Source: R-value requirements from IECC 2021 Table R402.1.3 (R-value alternative — insulation minimum R-values by component), including cavity-only and cavity-plus-continuous-insulation alternatives for wall assemblies, with the R402.2.1 ceiling exception. Insulation coverage rates from NAIMA (North American Insulation Manufacturers Association) technical bulletins. Material costs from RS Means Residential Construction Cost Data 2026.
8 min read
IECC 2021 R-Value Minimums by Climate Zone
Your climate zone sets the minimum R-value for every surface in your home. The Insulation Requirement Calculator pulls these minimums from the IECC 2021 code tables and matches them against the insulation type and cavity depth you have available, telling you whether your planned assembly meets code before you buy a single batt or bag.
The IECC divides the US into seven climate zones based on heating and cooling degree days. Zones 1-2 cover the Gulf Coast and Deep South, where cooling loads dominate and R-value minimums are lowest. Zones 6-7 cover the upper Midwest, northern New England, and Alaska, where heating loads are extreme and code demands the highest insulation levels.
The following table shows the minimum R-value requirements from IECC 2021, Table R402.1.3 (the R-value compliance path). These are the numbers your building inspector checks during a framing inspection.
| Climate Zone | Exterior Walls | Attic / Ceiling | Floors | Basement Walls |
|---|---|---|---|---|
| Zone 1 (Hot Humid) | R-13 | R-30 | R-13 | None |
| Zone 2 (Hot) | R-13 | R-49 | R-13 | None |
| Zone 3 (Warm) | R-20 or R-13+5ci | R-49 | R-19 | R-5 |
| Zone 4 (Mixed) | R-30 or R-20+5ci or R-13+10ci | R-60 | R-19 | R-10 |
| Zone 5 (Cool) | R-30 or R-20+5ci or R-13+10ci | R-60 | R-30 | R-15 |
| Zone 6 (Cold) | R-30 or R-20+5ci or R-13+10ci | R-60 | R-30 | R-15 |
| Zone 7 (Very Cold) | R-30 or R-20+5ci or R-13+10ci | R-60 | R-38 | R-15 |
The "+ci" notation means continuous insulation — rigid foam board installed on the exterior of the sheathing, unbroken by framing members. IECC 2021 Table R402.1.3 allows several cavity-plus-continuous combinations as alternatives to the full cavity R-value. In Zone 3, R-13 cavity plus R-5 continuous foam meets the R-20 wall requirement. In Zones 4-7, the R-30 cavity-only minimum can instead be met with R-20 cavity plus R-5 continuous, or R-13 cavity plus R-10 continuous. This matters because a standard 2x4 wall tops out near R-13 with fiberglass batts — adding rigid foam outside the sheathing bridges the gap to code without reframing to deeper studs.
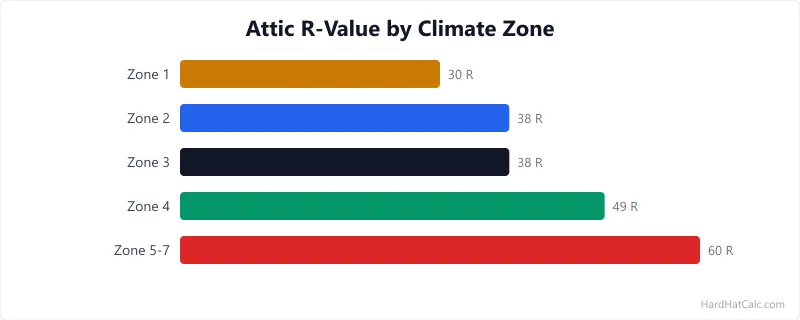
The attic minimum steps up by zone: R-30 in Zone 1, R-49 in Zones 2-3, then R-60 from Zone 4 north. The Zone 3-to-4 boundary — running roughly along a line from southern Virginia through Kentucky, Missouri, and into Kansas — lifts the attic from R-49 to R-60, adding 2-3 inches of extra blown-insulation depth and a hundred-odd dollars to the material bill. (Section R402.2.1 lets R-49 stand in for R-60 where the full insulation height clears the wall top plate at the eaves.)
Insulation Types Compared
Not all insulation materials perform equally at the same thickness. The metric that matters is R-value per inch — how much thermal resistance each inch of material provides. Higher R-per-inch means you reach the target R-value with thinner assemblies, which matters in wall cavities where space is fixed.
Fiberglass batts deliver R-3.2 per inch. They are the cheapest option at roughly $0.80 per square foot (material cost, March 2026 US averages) and the most familiar to DIY installers. The downside: batts must fit the cavity precisely. Compressed batts lose R-value, and gaps around wiring and plumbing create thermal bridges. A batt that fills 95% of the cavity but leaves a 1-inch gap along one stud can lose 25-40% of its rated R-value due to convective looping in the gap.
Mineral wool batts hit R-3.8 per inch — about 19% more than fiberglass for each inch of thickness. They cost more ($1.30/sq ft) but offer superior fire resistance (non-combustible up to 2,150 degrees F), better sound attenuation, and they hold their shape in the cavity rather than sagging over time. For soundproofing projects, mineral wool is the standard recommendation because its density absorbs low-frequency noise that fiberglass passes through.
Blown-in fiberglass (R-2.5/inch) fills irregular cavities and attic floors by machine. At $1.10/sq ft, it is mid-priced and works well in existing attics where you need to build up depth over old insulation. Blown-in cellulose (R-3.5/inch, $1.00/sq ft) outperforms blown fiberglass per inch and costs slightly less. Cellulose is made from recycled newsprint treated with borate fire retardant. It settles about 20% over the first year, so installers blow it to 120% of the target depth to compensate.
Open-cell spray foam (R-3.7/inch, $1.50/sq ft) expands to fill every crack and void, creating an air seal as well as thermal insulation. It is the best choice for irregularly shaped cavities and rim joists. Closed-cell spray foam (R-6.5/inch, $2.80/sq ft) is the premium option — the highest R-per-inch of any common residential insulation. A 3.5-inch cavity of closed-cell spray hits R-22.75, which clears the R-20 cavity-only wall minimum in Zone 3 and, paired with a little exterior continuous foam, satisfies the R-20+5ci path Zones 4-7 require — performance a 2x4 fiberglass batt (R-11.2) cannot approach. Closed-cell foam also acts as a vapour barrier, eliminating the need for a separate poly sheet. For the decision between the two on a real wall, foam versus fiberglass batts side by side lays out when each one wins.
When Exceeding Code Minimums Pays for Itself
Code minimums are the floor, not the ceiling. In many real-world situations, building to the code minimum makes sense economically. In others, going beyond code pays for itself in energy savings within 3-5 years.
The clearest case for exceeding code is attic insulation in the colder zones, where the marginal cost of more depth is low. Heat rises, and attic insulation stops it from leaving through the roof — blown-in runs only about $0.30-$0.50 per sq ft per R-value in an open attic. But the returns diminish fast above the R-60 minimum: pushing a 1,200 sq ft Zone 5 attic from R-60 to R-70 costs roughly $200-$400 in extra cellulose while trimming only a few percent more off the original heat loss, so the payback stretches past a decade. The bigger wins come from reaching the R-60 minimum everywhere and air-sealing first, not from piling depth beyond code.
Wall insulation is a different calculation. You are limited by cavity depth unless you add exterior continuous insulation, which involves removing siding, installing rigid foam board, re-flashing windows, and reinstalling siding. That work costs $4-$8 per square foot and is only worth it during a full siding replacement or major renovation. If you are reframing walls during a gut renovation, switching from 2x4 to 2x6 studs adds roughly $0.50-$1.00 per linear foot of wall but gives you 2 extra inches of cavity depth — that is the cheapest time to upgrade.
Basement walls present a unique challenge. Below-grade walls experience moisture intrusion from soil, so the insulation choice must handle moisture without degrading. Closed-cell spray foam is the preferred basement wall insulation because it insulates, air-seals, and acts as a moisture barrier in one application. Fiberglass batts in a basement are a mould disaster waiting to happen — the kraft-paper facing traps moisture against the concrete, creating an ideal growing environment.
After insulation is complete and walls are sealed, the next step in most renovation sequences is finishing the surfaces. For interior walls, that means drywall and joint compound. For exterior walls after residing, the surface may need priming and painting once the rigid foam and weather-resistant barrier are in place.
Compression, Vapour Barriers, and Air Sealing First
Check your actual cavity depth before buying. A "2x4 wall" has a 3.5-inch cavity, and a "2x6 wall" has a 5.5-inch cavity — the lumber dimensions are nominal, not actual. Older homes (pre-1960s) may have true-dimension lumber with deeper cavities, or they may have balloon framing with no fire stops between floors. Measure the actual depth at several points before ordering insulation.
Compression kills R-value. Stuffing R-19 batts designed for a 2x6 cavity into a 2x4 cavity does not give you R-19. The compressed batt reaches approximately R-13 and costs more than a properly sized R-13 batt. Buy the right product for the cavity depth — manufacturers make batts specifically sized for 2x4, 2x6, and 2x8 cavities.
Vapour barriers go on the warm side. In heating climates (Zones 4-7), the vapour barrier (kraft paper facing or poly sheet) faces the interior — the warm side in winter. In cooling climates (Zones 1-2), it faces the exterior. In mixed climates (Zone 3), check local code. Putting the vapour barrier on the wrong side traps moisture inside the wall, which leads to mould, rot, and structural damage that you will not discover until something fails.
Do not insulate over knob-and-tube wiring. Homes built before 1950 may have knob-and-tube electrical wiring running through wall and attic cavities. This wiring relies on air circulation for cooling. Covering it with insulation traps heat and creates a fire hazard. Have an electrician inspect and replace any knob-and-tube runs before insulating.
Air sealing comes before insulation. Insulation slows heat conduction through solid materials. Air leaks bypass insulation entirely. Before adding insulation to an attic, seal every penetration — plumbing stacks, electrical boxes, recessed lights, HVAC boots, and the gap between the top plate and drywall. A well-sealed attic with R-30 outperforms a leaky attic with R-49 in real-world energy use.
Vapour Barriers and Moisture Control
Insulation and moisture are inseparable topics. Every insulation decision carries a moisture management consequence, and getting it wrong causes problems far more expensive than the insulation itself.
Vapour diffusion moves moisture from high-humidity areas toward low-humidity areas through solid materials. In winter, warm moist indoor air tries to push moisture outward through walls toward the cold dry exterior. In summer, the direction reverses in air-conditioned homes. The vapour barrier's job is to slow this diffusion enough to prevent condensation inside the wall cavity.
Kraft-faced fiberglass batts have a built-in vapour retarder (the kraft paper). Install them with the paper facing the conditioned space. Unfaced batts are used when a separate vapour barrier is specified, when adding a second layer over existing insulation (only the first layer should have a vapour barrier), or when the insulation type itself acts as a vapour barrier — closed-cell spray foam at 1.5 inches or more meets code for a Class II vapour retarder without any additional membrane.
In mixed-humid climates (Zone 4A, including much of the mid-Atlantic and lower Midwest), code allows "smart" vapour retarders like MemBrain that change permeability based on ambient humidity — open to vapour when humidity is high (allowing the wall to dry inward during summer), and closed when humidity is low (retarding outward diffusion during winter). These products cost more but solve the fundamental problem of mixed climates where the vapour drive reverses seasonally.
Worked Examples
Example 1
Scenario: A homeowner in Minneapolis (Climate Zone 6) needs to insulate a 1,200 sq ft attic floor with blown-in cellulose. The attic is open with no depth restriction.
Calculation: Required R-value for Zone 6 attic = R-60 (IECC 2021 Table R402.1.3). Cellulose R-value per inch = 3.5, so depth needed = 60 ÷ 3.5 ≈ 17.1 inches. Bags needed = 1,200 × (60 ÷ 13) ÷ 36 = 1,200 × 4.62 ÷ 36 = 154 bags. Estimated material cost = 1,200 × $1.00 = $1,200.
What this means: The attic needs about 17 inches of blown cellulose to reach R-60. That is 154 bags, weighing roughly 3,850 lbs once installed. The material alone costs around $1,200, and a professional installer typically charges $1.50-$2.50 per sq ft on top of material for machine blowing — so total installed cost runs about $3,000-$4,200 for this attic.
Takeaway: Blown cellulose is one of the cheapest ways to hit the R-60 attic minimum. Renting a blowing machine from a home centre ($50-$100/day) and doing it yourself can cut total cost by about 40%, though you need two people — one feeding the machine, one directing the hose.
Example 2
Scenario: A homeowner in Nashville (Climate Zone 4) is insulating 800 sq ft of exterior walls during a renovation. The walls use 2x4 framing with 3.5-inch cavities, and fiberglass batts are the chosen material.
Calculation: Required R-value for Zone 4 walls = R-30 (IECC 2021 Table R402.1.3). Fiberglass batt R-value per inch = 3.2, so achievable R = 3.2 × 3.5 = R-11.2 in a 2x4 cavity. Batts needed = 800 ÷ 32 = 25 batts. Estimated material cost = 800 × $0.80 = $640.
What this means: The 2x4 cavity reaches only R-11.2 with fiberglass batts, about 37% of the R-30 cavity-only minimum, so the calculator flags it as not meeting code. Cavity fill alone cannot close that gap: even a 2x6 wall holds just R-17.6 of fiberglass. The realistic Zone 4 paths are the continuous-insulation alternatives (R-20 cavity + R-5 ci, R-13 cavity + R-10 ci, or R-0 + R-20 ci) or a denser cavity material such as closed-cell spray foam paired with exterior foam.
Takeaway: A 2x4 fiberglass wall cannot reach the Zone 4 R-30 minimum on cavity insulation alone. If you are already opening the walls, plan for exterior continuous rigid foam over the sheathing (the R-13+10ci or R-20+5ci path) rather than relying on a deeper [stud cavity](/calculators/structural/wall-framing-calculator) — fiberglass tops out near R-17.6 even in a 2x6.
Frequently Asked Questions
- What R-value insulation do I need for my climate zone?
The IECC 2021 sets minimum R-values by climate zone and building component (Table R402.1.3). In Zones 1-2, exterior walls need R-13; attics need R-30 in Zone 1 and R-49 in Zone 2. By Zone 4, walls rise to R-30 (or an R-20+5ci / R-13+10ci continuous-insulation path) and attics to R-60. Zone 7 (northern Minnesota, Alaska) requires R-60 attics, R-30 walls, and R-38 floors. Section R402.2.1 lets a lower attic R substitute where the full insulation height clears the wall top plate — R-49 for R-60, R-38 for R-49. Your local building department may adopt stricter requirements, so verify with your permit office before ordering. The R-values explained guide breaks down how different materials achieve the same R-value at different thicknesses.
- Can a 2x4 wall cavity meet IECC 2021 wall R-value minimums?
It depends on the zone and the material. A 2x4 wall has a 3.5-inch cavity, which reaches R-11.2 with fiberglass batts (3.2 per inch) or R-22.75 with closed-cell spray foam (6.5 per inch). That clears the R-20 cavity-only minimum for Zone 3 walls with closed-cell, but it falls short of the R-30 cavity-only minimum Zones 4-7 set under IECC 2021 Table R402.1.3 — no material fits R-30 into 3.5 inches. For those zones you use a continuous-insulation path instead: R-20 cavity + R-5 ci, R-13 cavity + R-10 ci, or R-0 + R-20 ci. That keeps 2x4 framing viable in cold climates when paired with exterior foam sheathing. The spray foam cost calculator prices out closed-cell by board foot if that route interests you.
- Is blown-in insulation better than batts for an existing attic?
For an existing attic with no insulation removal, blown-in is almost always the better choice. Blown cellulose or fiberglass fills around obstructions — wiring, plumbing vents, junction boxes, irregular joist spacing — that batts cannot conform to without cutting and fitting each piece by hand. Blown-in also covers the top plates and framing members that batts bridge over, reducing thermal bridging. The main advantage of batts is in new construction where cavities are clean and uniform. For retrofit attic work, the machine-blown approach is faster, cheaper per square foot, and produces a more consistent thermal blanket. If you are also insulating walls, pair the attic work with a vapor barrier on the warm side of the assembly.
- How much does it cost to insulate a 1,000 square foot attic in 2026?
Material costs range from $800 to $2,800 depending on the insulation type, based on March 2026 US national averages. Blown-in fiberglass runs about $1,100 (1,000 sq ft at $1.10/sq ft), blown cellulose about $1,000, and open-cell spray foam about $1,500. Professional installation typically adds $0.50-$1.50 per square foot on top of material cost, putting total installed cost at $1,300-$4,000 for most attics. DIY blown-in installation with a rented machine costs roughly 30-40% less than professional, but spray foam requires professional equipment and training. For masonry buildings, the block-wall R-value tool shows how block walls perform before and after insulation. IECC fenestration limits are expressed as percentages of gross wall area — convert square feet to a percentage when checking window-to-wall ratio compliance.
More Materials calculators
Browse all materials calculators — Paint coverage, roofing bundles, tile adhesive, welding time, parking lot sizing, and more.