Wall Framing Calculator
Free wall framing calculator for studs, plates, headers, king studs, and jack studs at 16 or 24 in OC. Counts lumber for door and window openings.
Last updated:
Reviewed by Doc. dr. sc. Mladenka Juradin, dipl. ing. građ., PhD, Civil Engineering (FCEAG, University of Split)
Total length of the wall you are framing.
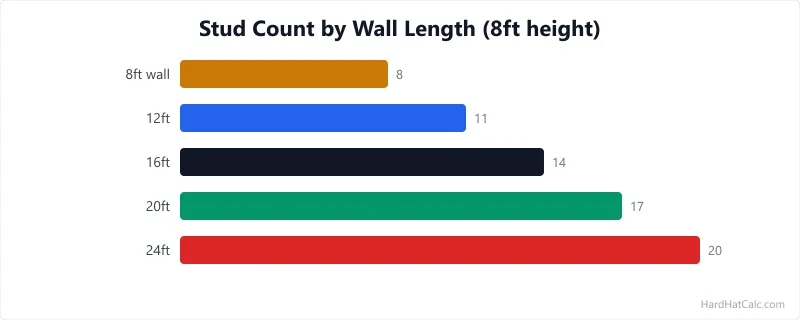
Floor to ceiling height. Standard residential is 8 ft (uses pre-cut 92-5/8" studs).
16" OC is standard for exterior and load-bearing walls. 24" OC is used for interior partitions.
Standard interior doors (36" rough opening). Each adds king studs, jack studs, and a header.
Standard windows (36" rough opening). Each adds king studs, jack studs, header, and sill.
For estimation only. Structural work requires review by a licensed engineer. Local building codes take precedence over any calculator output.
How This Is Calculated
Base studs = ceil(wall length in inches / spacing) + 1 + 6 corner studs. Door openings: +4 studs each (2 king + 2 jack, net of lost regulars + cripples). Window openings: +6 studs each (2 king + 2 jack + cripples, net). Plates = wall length x 3 (double top plate + single bottom plate). Headers = (doors + windows) × 3.33 ft x 2 (doubled). Total lumber = stud count x wall height + plates + headers.
Source: Stud spacing and header requirements per IRC (International Residential Code) Section R602. Advanced framing per DOE Building America Best Practices guide.
6 min read
Stud Counts by Wall Configuration
Every door and window adds lumber that a basic stud calculator misses. A standard 36-inch door opening needs two king studs (full height, flanking the opening), two jack studs (shortened, supporting the header), a doubled header, and one or two cripple studs above the header. That is 4–5 extra studs plus header material for each door. Windows add even more: a sill plate and cripple studs below the sill on top of everything a door needs.
| Wall Configuration | Length | Spacing | Doors | Windows | Studs | Plates (ft) | Headers (ft) | Total Lumber (ft) |
|---|---|---|---|---|---|---|---|---|
| Simple partition | 12 ft | 24" OC | 0 | 0 | 13 | 36 | 0 | 140 |
| Interior with door | 12 ft | 24" OC | 1 | 0 | 17 | 36 | 7 | 179 |
| Exterior wall | 20 ft | 16" OC | 1 | 2 | 37 | 60 | 20 | 376 |
| Long exterior | 30 ft | 16" OC | 1 | 3 | 52 | 90 | 27 | 533 |
| Basement partition | 16 ft | 16" OC | 2 | 0 | 29 | 48 | 13 | 293 |
These figures use standard 8-foot wall height with 3-stud corners. Taller walls (9 or 10-foot ceilings) increase the stud lumber proportionally but don't change the count.
The Anatomy of a Framed Wall
A framed wall has more parts than studs and plates, and understanding each one prevents ordering mistakes.
The bottom plate (sole plate) is a single horizontal 2x4 that sits on the subfloor and anchors the wall. For exterior walls on concrete, this must be pressure-treated lumber because it contacts the slab. The bottom plate gets cut out at door openings after the wall is plumbed and nailed off.
The top plate is doubled — two horizontal 2x4s stacked on top of each other. The double plate carries the load from joists or trusses above and allows the upper plate to lap across wall intersections, tying perpendicular walls together. On non-load-bearing partitions, some codes allow a single top plate if metal connectors are used at intersections, but the double plate is standard practice.
King studs are full-height studs that frame the sides of an opening. They run from bottom plate to top plate just like regular studs. Jack studs (also called trimmer studs) are shorter studs nailed to the inside face of the king studs. Their tops support the header. The jack stud length equals the rough opening height.
The header bridges the top of an opening and transfers the load from above to the jack studs on each side. Header size depends on the span and the load above — for non-load-bearing walls, a flat 2x4 is enough. For load-bearing walls, headers are typically doubled 2x6, 2x8, or 2x10, depending on the opening width and the load carried. If a wall supports trusses, check the truss cost lookup to understand the loads involved — heavier trusses demand larger headers.
Cripple studs are short pieces that fill the space between the header and the top plate (above openings) and between the rough sill and the bottom plate (below windows). They maintain the stud spacing layout and provide nailing surfaces for sheathing and drywall.
16-Inch vs 24-Inch Stud Spacing: Material and Performance
The spacing choice is the single biggest driver of your stud count and lumber cost.
16-inch on-centre is the standard for exterior walls and load-bearing interior walls in most building codes. It provides more studs per linear foot of wall (0.75 studs per foot plus corners), which means more nailing surfaces for sheathing and siding, better racking resistance, and higher load capacity. A 20-foot wall at 16" OC uses about 16 full-length studs compared to 11 at 24" OC — roughly 45% more studs. The additional lumber cost for 16" OC on a 20-foot wall is roughly $25–$35 at current prices, which is a small price for the structural benefit.
24-inch on-centre is permitted by code for non-load-bearing interior partitions and, in some advanced framing methods, for exterior walls with specific sheathing requirements. The lumber savings are real but modest — about $5–$8 per linear foot of wall for studs alone. Where 24" OC shines is in advanced framing (Optimum Value Engineering / OVE), which reduces thermal bridging by using fewer studs and eliminates redundant framing members. If your walls are insulated with spray foam or rigid exterior insulation, 24" OC exterior walls can improve energy efficiency by reducing the percentage of wall area that is solid wood (which insulates poorly compared to cavity insulation). The insulation R-value guide breaks down which cavity depths and insulation types match each climate zone.
For most residential projects, default to 16" OC for exterior and load-bearing walls, and 24" OC for interior partitions. Your local building code has the final word — always check before framing.
Framing a Wall: Order of Operations
Snap layout lines. Mark the wall location on the subfloor using a chalk line. For partitions, snap both edges of the bottom plate (3.5 inches apart for 2x4 framing) so the plate position is unambiguous.
Cut plates and mark stud layout. Cut top plates and bottom plate to length. Lay them side by side and mark stud locations simultaneously — this guarantees the studs are vertically aligned. Mark 16" OC (or 24" OC) from one end, then mark king stud and jack stud locations for each opening.
Cut studs. For 8-foot ceilings, use pre-cut studs (92-5/8 inches, per standard framing practice for 8-foot finished ceilings with three plates) — they are exactly the right length for a single bottom plate, double top plate, and 8-foot finished ceiling height. For non-standard heights, cut studs to wall height minus 4.5 inches (three plate thicknesses).
Assemble on the floor. Lay the bottom plate and top plate flat on the subfloor with studs between them. Nail through the plates into the stud ends with two 16d nails per connection. Assemble headers and install them with jack studs before tilting the wall up.
Tilt up and plumb. Lift the assembled wall into position, slide it to the chalk line, and nail the bottom plate to the subfloor. Plumb the wall with a 4-foot level and brace it with diagonal 2x4s until the second top plate and intersecting walls lock everything in place.
Install the second top plate. The upper top plate laps across wall intersections by at least 48 inches. Stagger the joints between the lower and upper top plates by at least one stud bay. Nail the upper plate to the lower with 16d nails at 16-inch intervals.
Lumber Grades and Buying Tips
Not all 2x4s are created equal, and picking the right grade saves hassle on the job site.
For studs, buy "stud grade" or "#2 or better" SPF (Spruce-Pine-Fir) or Southern Yellow Pine. Stud grade is specifically graded for vertical framing — it allows minor wane (bark edge) and small knots but limits bowing and crooking. Inspect every stud at the lumber yard. Sight down the edge for bow (a gentle curve along the length) and twist (the stud corkscrews). A slight bow can be pulled straight during installation, but a twisted stud is scrap — it will fight you at every nail.
For plates and headers, standard #2 dimensional lumber works. Plates do not need to be as straight as studs because they lie flat and get nailed down. Headers in load-bearing walls need a higher grade or engineered lumber (LVL) for spans over 4 feet.
Buy 5–10% extra beyond the calculated count. Culling twisted and damaged studs at the yard plus on-site cutting waste will use those extras. At $3.50–$5.00 per pre-cut stud (March 2026 US national averages), the buffer costs $15–$25 per wall and prevents a return trip to the yard.
If your wall framing supports structural loads from a removed bearing wall, confirm the header size by running a tributary-load check — an undersized header in a load-bearing wall is a code violation and a structural hazard. For exterior walls that need siding estimates after framing, the material quantity depends on the wall dimensions and opening layout you have already calculated here.
Worked Examples
Example 1
Scenario: A homeowner is framing a 16-foot basement partition wall at 16-inch on-centre spacing with one standard door opening and no windows.
Calculation: Base studs = ⌈16 × 12 / 16⌉ + 1 = 13. Corner studs = 6. Door studs = 1 × 4 = 4. Window studs = 0. Total studs = 13 + 6 + 4 = 23. Plates = 16 × 3 = 48 linear ft. Headers = 1 × 3.33 × 2 = 7 linear ft. Stud lumber = 23 × 8 = 184 ft. Total lumber = 184 + 48 + 7 = 239 ft. Cost = (23 x $4.25) + (48 x $0.55) + (7 x $0.95) = $97.75 + $26.40 + $6.65 = $130.80.
What this means: The 16-foot partition needs 23 studs, 48 feet of plate stock, and 7 feet of header material. Total lumber cost is about $131 at mid-range March 2026 pricing.
Takeaway: A single door adds 4 studs plus a doubled header. For a basement partition, pre-cut 92-5/8-inch studs (per standard framing practice for 8-foot finished ceilings with three plates) are exact for 8-foot ceilings with double top plate and single bottom plate.
Example 2
Scenario: A contractor is framing a 30-foot exterior wall at 16-inch OC with one entry door and three windows, standard 8-foot ceiling height.
Calculation: Base studs = ⌈30 × 12 / 16⌉ + 1 = 24. Corner studs = 6. Door studs = 1 × 4 = 4. Window studs = 3 × 6 = 18. Total studs = 24 + 6 + 4 + 18 = 52. Plates = 30 × 3 = 90 ft. Headers = (1 + 3) × 3.33 × 2 = 27 ft. Stud lumber = 52 × 8 = 416 ft. Total lumber = 416 + 90 + 27 = 533 ft. Cost = (52 x $4.25) + (90 x $0.55) + (27 x $0.95) = $221.00 + $49.50 + $25.65 = $296.15.
What this means: This exterior wall requires 52 studs, 90 feet of plates, and 27 feet of header lumber, totalling 533 linear feet. Estimated cost is around $296 for framing lumber alone.
Takeaway: Four openings in a 30-foot wall add 22 extra studs beyond the base count. Budget 5-10% extra studs to cull twisted or split pieces at the lumber yard.
Frequently Asked Questions
- How many studs do I need for a 20-foot wall at 16-inch spacing?
A 20-foot wall at 16-inch on-centre spacing needs 16 regular studs (240 inches / 16 = 15 spaces, plus one at each end = 16 studs) plus 6 corner studs if both ends are corners. Add studs for any openings: 4 extra per door, 6 extra per window. A 20-foot exterior wall with one door and two windows needs about 37 studs total. At March 2026 pricing of $3.50–$5.00 per pre-cut stud, that is $130–$185 for studs alone, before plates and headers. Once the walls are up, estimate the drywall sheet quantities for both sides of the framing to budget the finish materials.
- What size header do I need above a door in a load-bearing wall?
For a standard 36-inch (3-foot) door opening in a load-bearing wall supporting one floor and a roof, a doubled 2x6 header is typically adequate. Wider openings need larger headers: 4-foot openings usually need doubled 2x8, and 6-foot openings (like double doors or sliding doors) typically need doubled 2x10 or 2x12. These are general guidelines based on IRC prescriptive tables — the actual required header size depends on the span, the tributary load above, and the species and grade of lumber. The door header size calculator looks up the IRC prescriptive requirement based on span, snow load, and storeys supported.
- Why does a framed wall have a double top plate?
The double top plate serves two structural purposes. First, it distributes point loads from above — joists and trusses bearing on the wall transfer load through the upper plate to the studs below, even when the joist does not land directly on a stud. Second, the upper plate laps across wall intersections, physically tying perpendicular walls together at the top. This lap connection (minimum 48 inches of overlap) is what prevents walls from separating at corners and T-intersections under lateral loads like wind. Some advanced framing methods allow a single top plate with metal clip connectors at intersections, but the double plate remains standard practice because it is simple, strong, and well-understood by framers. If the wall is load-bearing, a beam-replacement load tool determines the total load it carries and the beam size needed if the wall is removed.
- Should I frame with 2x4 or 2x6 studs?
For most residential construction, 2x4 studs (actual dimension 1.5" x 3.5") are used for interior partitions and are permitted for exterior walls up to one storey in most codes. 2x6 studs (1.5" x 5.5") are increasingly common for exterior walls because the deeper cavity accepts R-19 or R-21 insulation versus R-13 or R-15 in a 2x4 wall. In cold climates (zones 5 and above), many codes now require 2x6 exterior walls to meet minimum insulation requirements. The material cost difference is roughly 40–60% more for 2x6 studs, but the energy savings over the life of the building far exceed the incremental framing cost. Use 2x4 for interior walls and 2x6 for exterior unless your code or energy goals say otherwise. The insulation R-value guide breaks down which cavity depths match which climate zone requirements.
- How do I estimate waste when ordering framing lumber?
Add 5–10% to your calculated lumber quantities for waste. Waste comes from three sources: defective pieces culled at the yard or on site (twisted studs, split ends), cut-off drops from headers and cripples that are too short to reuse, and accidental damage during framing. For a typical 20-foot wall with openings, 5% covers normal waste. For complex walls with many openings or unusual heights requiring non-standard stud lengths, increase to 10%. Pre-cut studs generate almost zero waste on standard 8-foot walls because they are already cut to the exact length needed. After framing, estimate siding material quantities based on the wall area minus the openings you have already counted here.
More Structural calculators
Browse all structural calculators — Beam sizing, truss pricing, load calculations, wall framing, deck capacity, and foundation tools.