Wall Soundproofing Calculator
Soundproofing a wall? Use this wall soundproofing calculator to estimate mass-loaded vinyl, resilient channel, double drywall, and total project costs.
Last updated:
Reviewed by Doc. dr. sc. Bojan Milovanović, dipl. ing. građ., PhD, Civil Engineering (FCE, University of Zagreb)
Total wall surface area. Multiply wall width × height for each wall section.
Floor-to-ceiling height. Standard residential is 8 ft.
Basic adds cavity insulation. Standard adds resilient channel and drywall. Premium uses MLV with double drywall. Maximum combines all layers.
Mineral wool is denser and absorbs more low-frequency sound. Fiberglass is cheaper but less effective per inch.
Open stud means the cavity is already exposed. Single drywall means existing drywall must be removed first.
How This Is Calculated
Insulation batts = wall area ÷ 32 (rounded up). Drywall sheets = wall area ÷ 32 (single layer) or × 2 (double layer), rounded up. Resilient channel = wall area × 0.75 linear ft (16" OC spacing). MLV rolls = wall area ÷ 60 (rounded up). Acoustic sealant = 1 tube per drywall sheet, minimum 2. Cost = insulation (fiberglass $0.70/sq ft or mineral wool $1.10/sq ft) + drywall ($14/sheet) + channel ($1.50/ft) + MLV ($120/roll) + sealant ($8/tube) + demo ($0.50/sq ft if removing existing drywall).
Source: Sound Transmission Class (STC) ratings per ASTM E90 and E413 test standards. Material quantities based on manufacturer installation specifications (Roxul, QuietRock, Mass Loaded Vinyl Barrier Corp). Cost data from RS Means Interior Construction Cost Data 2026.
8 min read
STC Ratings and What They Mean for Your Wall
An STC rating of 33 is the number that separates "I can hear every word next door" from "I know someone is talking but cannot make out the words." That single number — the Sound Transmission Class — measures how many decibels of airborne sound a wall assembly blocks. The Wall Soundproofing Calculator estimates materials and costs for upgrading your wall to a higher STC rating, whether you are dealing with a noisy neighbour, a home theatre that rattles the bedroom, or a nursery that needs quiet.
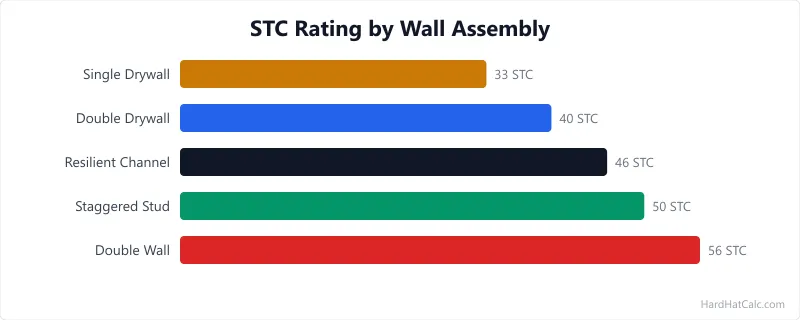
A standard interior wall (single layer of 1/2-inch drywall on each side, empty stud cavity) rates STC 33. Normal speech is clearly audible through it. Adding mineral wool insulation to the cavity bumps it to STC 37–39. Mount the new drywall on resilient channel instead of directly to the studs and you reach STC 44–46 — loud speech is audible but not intelligible. Layer mass-loaded vinyl behind double drywall on resilient channel and you push past STC 55, where most household noise is effectively blocked.
Each layer in a soundproofing assembly does something different. Insulation absorbs sound energy inside the cavity, converting vibration to heat. Resilient channel decouples the drywall from the framing, breaking the mechanical path that transmits vibration. MLV adds mass without adding thickness — a 1-lb-per-square-foot sheet is only 1/8 inch thick. Double drywall adds more mass and creates a damping sandwich when combined with acoustical caulk between the layers. No single layer does the job alone. Effective soundproofing works because the layers address different parts of the sound transmission problem.
Party walls in multi-family buildings typically require a fire-resistance rating (1 or 2 hours per IBC). Adding soundproofing layers may affect the assembly's fire rating. Verify with your local building department before modifying shared walls. Some assemblies (such as resilient channel with Type X drywall) can satisfy both fire and acoustic requirements simultaneously, but this must be confirmed against the specific UL or GA fire-rated assembly listing for your wall type. Removing existing drywall from a fire-rated wall and replacing it with a non-rated assembly can violate building code and create liability.
If the wall you are soundproofing requires new framing — either because you are adding a decoupled stud wall or because the existing framing needs replacement — you can run a stud count for the stud layout and material quantities of the new wall section.
Insulation Types: Fiberglass vs. Mineral Wool
Both fiberglass and mineral wool fill the stud cavity and absorb sound, but they are not equally effective. Choosing the right insulation is the single decision that costs the least to get right and the most to get wrong — you only get one chance to fill the cavity before it is sealed behind drywall.
Mineral wool (Roxul / Rockwool Safe'n'Sound) is denser than fiberglass — typically 2.5 to 4 lbs per cubic foot versus 0.5 to 1.0 lbs for fiberglass. That density absorbs more low-frequency sound, which is exactly the bass-heavy noise that travels through walls most effectively. Mineral wool is semi-rigid, so it friction-fits between studs without sagging or slumping over time. It is also non-combustible and resists moisture. At $1.10 per square foot (March 2026 US average), mineral wool costs about 57% more than fiberglass, but the acoustic performance difference is worth every cent in a dedicated soundproofing project. The same density advantage that helps with sound also drives mineral wool's R-3.8 per inch thermal rating. Why mineral wool is the standard density for soundproofing breaks down how the material handles thermal and acoustic duty at once.
Fiberglass batts are the cheaper option at $0.70 per square foot. Standard R-13 fiberglass batts fit a 2×4 stud cavity and provide moderate sound absorption. Fiberglass is lighter, easier to cut, and widely available. For a basic soundproofing job where the goal is reducing general noise rather than achieving a specific STC target, fiberglass is adequate. The limitation shows up in low-frequency performance: fiberglass batts lack the mass to absorb bass, so television sound, music, and footfall noise pass through more readily than through mineral wool.
For most soundproofing projects, mineral wool is the better investment. The $0.40 per square foot premium over fiberglass adds only $48 to a 120-sq-ft wall — a small fraction of the total project cost — and delivers measurably better results across the frequency range that matters most in residential settings.
The material costs in this calculator cover the soundproofing assembly itself. If the project involves finishing the new drywall layers with tape and compound, the drywall joint compound calculator estimates compound, tape, and corner bead quantities based on sheet count and finish level.
Material Requirements by Method
The four soundproofing methods in this calculator represent increasing levels of noise reduction. Each method adds layers to the wall assembly, and each layer contributes a measurable STC improvement. The table below shows what each method includes and the approximate STC range you can expect.
| Method | Layers Included | Approx. STC | Best For |
|---|---|---|---|
| Basic | Cavity insulation only | 37–39 | General noise reduction on a budget |
| Standard | Insulation + resilient channel + single drywall | 44–46 | Shared bedroom walls, home offices |
| Premium | Insulation + MLV + double drywall | 48–52 | Apartment party walls, nurseries |
| Maximum | Insulation + resilient channel + MLV + double drywall | 55–60 | Home theatres, music rooms, studios |
All STC ratings assume mineral wool insulation in a standard 2×4 stud cavity with 5/8-inch drywall. Fiberglass insulation reduces each rating by 2–3 points. Existing STC depends on the starting wall condition — an open stud cavity starts at STC 20, while a single-drywall wall starts at STC 33. Prices as of March 2026, based on US national averages from RS Means Interior Construction Cost Data.
The jump from basic to standard is the most cost-effective upgrade. Resilient channel costs $1.50 per linear foot and a single layer of drywall runs $14 per 4×8 sheet — together they add 7–9 STC points. The jump from premium to maximum adds resilient channel to the MLV-and-double-drywall assembly, gaining another 3–5 STC points for $1.50 per linear foot of channel. Diminishing returns set in above STC 55: each additional point costs more and delivers less perceptible difference.
Sealing the Gaps: Where Most DIY Soundproofing Fails
Sound behaves like water — it finds the smallest gap and pours through it. A wall with STC 55 materials but a 1/4-inch gap at the bottom plate performs like STC 35 at best. Sealing is the step most DIYers skip or under-do, and it is the single most common reason soundproofing projects disappoint.
Where do sound leaks happen? Every perimeter edge of the drywall — top, bottom, and sides — must be sealed with acoustic sealant (not regular caulk). Electrical outlets and switch boxes are the worst offenders: a standard single-gang box creates a hole through the wall that leaks sound directly into the next room. Light fixtures, HVAC registers, and plumbing penetrations are equally problematic. The gap between the bottom of the drywall and the floor is another common leak point that regular baseboard trim does not seal.
What is acoustic sealant and why not regular caulk? Acoustic sealant (also called acoustical caulk) remains permanently flexible. It never fully cures, which means it maintains its seal even as the building settles and framing moves seasonally. Regular silicone or latex caulk cures hard, then cracks as the wall moves — and every crack is a sound leak. One tube of acoustic sealant covers roughly 32 linear feet from a standard caulk gun. At $8 per tube (March 2026 US average), it is the cheapest material in the entire assembly and the one you should never skip.
How do I handle electrical outlets? Move outlets on opposite sides of the wall so they are not back-to-back — stagger them by at least one stud bay. Seal around every electrical box with acoustic sealant. For maximum performance, install acoustic putty pads (pre-formed putty sheets) over the back and sides of each box. These pads add mass and seal the box without interfering with wiring.
Does door and window sealing matter? Absolutely. A hollow-core interior door with a 1/8-inch gap at the bottom has an STC of about 15. No amount of wall treatment compensates for a door that leaks sound. If the room has an interior door, upgrading to a solid-core door and adding perimeter weatherstripping is as important as treating the walls.
Installation Sequence for a Soundproofed Wall
The order of operations in a soundproofing project matters more than the materials themselves. Installing layers in the wrong sequence creates gaps that compromise the entire assembly. If your project involves thermal insulation in addition to acoustic treatment, you can match insulation to climate zone and determine R-value targets.
Remove existing drywall (if applicable). Strip the drywall from the side of the wall you are treating. Pull all nails and screws from the studs. Inspect the cavity for plumbing, wiring, and HVAC runs — these will need to be worked around. Dispose of old drywall before proceeding; the dust interferes with adhesion of sealant.
Install insulation in the stud cavities. Press mineral wool or fiberglass batts into each stud bay. Mineral wool friction-fits without fasteners. Cut insulation to fit snugly around pipes and wires — no gaps, no compression. A compressed batt loses both thermal and acoustic performance.
Apply MLV to the stud face (premium and maximum methods). Staple or screw MLV sheets directly to the stud faces, overlapping seams by 2 inches. Seal every seam with MLV seam tape. The MLV layer must be continuous — any gap in the membrane is a sound leak. Cut carefully around electrical boxes and seal the edges with acoustic sealant.
Install resilient channel (standard and maximum methods). Screw resilient channel horizontally to the studs, spaced 16 inches on centre, starting 6 inches from the floor. Channels must not touch the floor, ceiling, or side walls — leave a 1/4-inch gap at all perimeters. This gap is what creates the decoupled air space. If a channel screw punches through into the stud behind the channel flange, it short-circuits the decoupling — use the correct screw length (1 inch for channel to stud, no longer).
Hang drywall and seal all edges. Screw drywall to the resilient channels (not to the studs — a single screw into a stud defeats the decoupling). Run a bead of acoustic sealant at the top plate, bottom plate, and where the drywall meets side walls. For double drywall, apply acoustic sealant or Green Glue compound between the two layers, then screw the second layer through the first into the channels.
Seal all penetrations. Caulk around every electrical box, pipe, and duct penetration with acoustic sealant. Install putty pads behind outlet boxes. Seal the gap at the floor with sealant before installing baseboard. Check for daylight around every edge and penetration — if light passes through, sound will too.
Worked Examples
Example 1
Scenario: A homeowner wants to reduce noise from a shared bedroom wall. The wall is 15 ft wide × 8 ft tall (120 sq ft), currently finished with single-layer drywall. They choose the standard method (insulation + resilient channel + new drywall layer) with mineral wool insulation.
Calculation: Insulation batts = ⌈120 ÷ 32⌉ = 4 batts. Drywall sheets = ⌈120 ÷ 32⌉ = 4 sheets (single layer). Resilient channel = ⌈120 × 0.75⌉ = 90 linear ft. MLV rolls = 0 (not used in standard method). Acoustic sealant = max(2, ⌈4 ÷ 1⌉) = 4 tubes. Insulation cost = 120 × $1.10 = $132. Drywall cost = 4 × $14 = $56. Channel cost = 90 × $1.50 = $135. Sealant cost = 4 × $8 = $32. Demolition allowance = 120 × $0.50 = $60. Total material cost = $132 + $56 + $135 + $0 + $32 + $60 = $415.
What this means: The standard method for a single bedroom wall runs about $415 in materials. Resilient channel is the largest single line item at $135 — it decouples the new drywall from the stud framing, which is where most of the noise reduction comes from. The demolition allowance adds $60 because the existing drywall must come off before insulation goes in. Prices reflect March 2026 US national averages.
Takeaway: Resilient channel is cheap per foot but adds up on larger walls. For a single bedroom wall this size, the standard method delivers the best cost-to-performance ratio — most homeowners gain 10–15 STC points for under $500 in materials.
Example 2
Scenario: A homeowner is building a dedicated home theatre with 400 sq ft of wall area (all four walls combined) at 9 ft ceiling height. The walls are new construction with open stud cavities. They choose the maximum method (all layers: mineral wool insulation + resilient channel + MLV + double drywall).
Calculation: Insulation batts = ⌈400 ÷ 32⌉ = 13 batts. Drywall sheets = ⌈(400 ÷ 32⌉ × 2) = 25 sheets (double layer). Resilient channel = ⌈400 × 0.75⌉ = 300 linear ft. MLV rolls = ⌈400 ÷ 60⌉ = 7 rolls. Acoustic sealant = max(2, ⌈25 ÷ 1⌉) = 25 tubes. Insulation cost = 400 × $1.10 = $440. Drywall cost = 25 × $14 = $350. Channel cost = 300 × $1.50 = $450. MLV cost = 7 × $120 = $840. Sealant cost = 25 × $8 = $200. Demolition allowance = $0 (open stud). Total material cost = $440 + $350 + $450 + $840 + $200 + $0 = $2,280.
What this means: The maximum method across 400 sq ft of wall brings materials to $2,280. MLV is the dominant cost at $840 — nearly 37% of the total. Double drywall adds mass (the single most effective sound barrier), and resilient channel breaks the mechanical connection between the inner and outer wall surfaces. This combination targets STC 55–60, which blocks most normal speech and reduces music and television sound by 22–27 dB compared to an uninsulated wall at STC 33.
Takeaway: For a home theatre, the maximum method is worth the investment. The $2,280 in materials delivers STC ratings comparable to commercial studio construction. Skipping MLV saves $840 but drops the STC by 5–8 points — a noticeable difference for bass frequencies that travel through walls most easily.
Frequently Asked Questions
- What STC rating do I need to block speech through a wall?
An STC rating of 45 blocks normal conversational speech so that it is inaudible in the next room. At STC 40, loud speech is audible but not intelligible — you know someone is talking but cannot make out the words. STC 50 blocks loud speech entirely, and STC 55+ handles amplified music and home theatre sound at moderate volumes. Most existing interior walls rate STC 33 (single drywall, empty cavity), which transmits normal speech clearly enough to follow a conversation through the wall. Adding cavity insulation that meets your climate zone requirements improves both thermal and acoustic performance in the same step.
- Does mass-loaded vinyl actually work for soundproofing?
Yes, but only as part of a layered assembly — MLV alone on a wall adds about 3–5 STC points, which is barely noticeable. Its value comes from adding mass without adding thickness. A 1-lb-per-square-foot MLV sheet is only 1/8 inch thick but adds the acoustic mass equivalent of a second layer of 5/8-inch drywall. Combined with insulation and resilient channel, MLV helps push an assembly past STC 50. Where MLV falls short: low-frequency bass, which requires decoupling (resilient channel or isolated stud walls) rather than mass alone. For the drywall finishing after installation, the joint compound calculator estimates mud and tape by sheet count.
- Can I soundproof a wall without removing existing drywall?
You can add layers over existing drywall, but the results will be limited. Adding a second layer of drywall directly over the existing surface gains only 3–5 STC points because the new layer is still mechanically coupled to the studs through the old drywall. Adding resilient channel over the existing drywall and then a new layer is more effective (6–8 STC points) but reduces the room width by about 1.5 inches per side. The most effective treatment requires removing the existing drywall to access the stud cavity for insulation and to properly install MLV and channel from the stud face out. The extra-layer board estimator estimates the additional boards, screws, and tape for the new layer.
- How much does it cost to soundproof a single wall in 2026?
Material costs for a standard 120-sq-ft bedroom wall (8 ft tall × 15 ft wide) range from $140 for basic insulation-only treatment to $415 for the standard method (insulation + resilient channel + drywall) to $850–$1,000 for the maximum method with MLV and double drywall. Labour adds $2–$5 per square foot if you hire a contractor, bringing the installed cost to $380–$1,600 depending on the method. Prices as of March 2026, based on US national averages. Costs vary by region, supplier, and whether you are removing existing drywall (add $0.50/sq ft for demolition and disposal). If the soundproofing project includes building a new decoupled stud wall, you can size the wall framing and lumber list.
More Materials calculators
Browse all materials calculators — Paint coverage, roofing bundles, tile adhesive, welding time, parking lot sizing, and more.