Fixing a Sagging Floor Joist
How to fix a sagging floor joist: diagnose the cause, tell cosmetic sag from structural failure, and know when a repair needs a structural engineer.
Reviewed by Doc. dr. sc. Mladenka Juradin, dipl. ing. građ., PhD, Civil Engineering (FCEAG, University of Split)
A sagging floor joist is a floor framing member that has bowed or settled below level, leaving the floor above it dipped, sloped, or springy underfoot. You usually meet the symptom before the cause: a marble that rolls to one side of the room, a gap opening under the skirting board, a door that has started to catch on its frame, or a patch of floor that gives as you cross it. The fix starts not with a jack or a saw but with a question. Is this an old building settling into a harmless lean, or a joist that is losing the fight with the load above it? This guide covers how to tell the two apart, what causes the sag in the first place, and where the line falls between a job you can take on and one that belongs to a structural engineer.
That line matters more here than on almost any other home job. A floor joist sits in the load path that carries everything above it down to the foundation. Get a repair wrong and you can move the problem rather than solve it, crack the finishes, or weaken the very member you set out to save. So the honest message of this guide is not that anyone can fix any sagging floor. It is this: diagnose first, understand the cause, know your limits, and bring in a professional when the signs call for it.
Diagnose Before You Lift: The Safety Line
A sagging floor can be a cosmetic quirk of an old house or the visible end of a structural problem, and only a licensed structural engineer can confirm which it is, and size any repair, for your specific floor. The building-code deflection limits and span tables referenced below are new-construction design figures, not a pass-or-fail verdict you can read off an existing floor. Treat what follows as background for an informed conversation with a professional, not a green light to start cutting and jacking.
Stop and get a structural engineer's assessment before any repair if you see any of these:
- Wood that is soft, crumbling, or punky, or any sign of rot, damp, or fungal growth on a joist, beam, or sill.
- Cracks that are widening over time, such as diagonal cracks at door and window corners or stair-step cracks in masonry below.
- A slope or dip that is visibly getting worse, rather than one that has sat unchanged for decades.
- More than one joist affected, or a whole section of floor dropping together.
- Any sign of foundation movement or settlement, or a support post, pier, or beam that has shifted.
- Doors and windows that have recently started to bind or rack across a room.
This is estimation and planning information only. Structural work requires review by a licensed engineer, and local building codes take precedence over any general guidance here.
What Makes a Floor Joist Sag
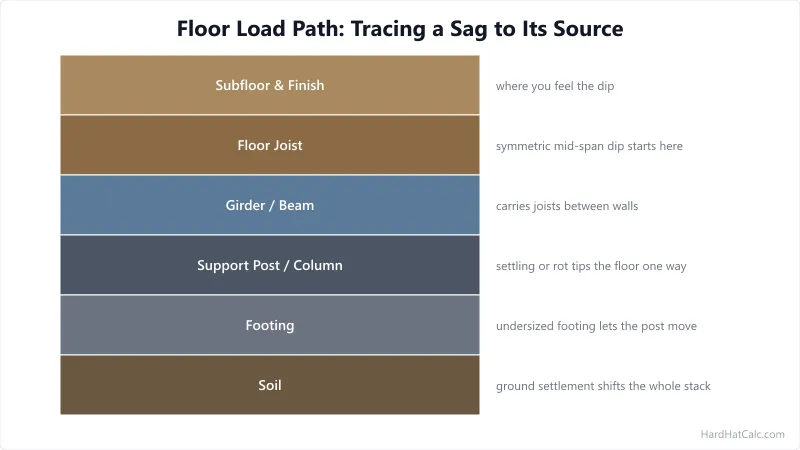
Before naming causes, read the shape of the sag, because it points to where the problem lives. A floor that dips symmetrically in the middle of a span, deepest halfway between the supporting walls, points to the joist itself bending. A floor that slopes steadily toward one line, whether a wall or a line running down the middle of the house, points instead to a support beneath that line giving way: a settled post, a sagging girder, a failing pier, or a rotted sill. The first is a joist problem; the second is a support problem, and the repair is not the same.
With that distinction in mind, these are the common causes:
- Undersized or over-spanned joists. The joist is too small, or the span too long, for the load it carries, so a floor framed with marginal joists sags first. Whether a given joist is adequate depends on its size, species, grade, spacing, span, and load. The floor joist size calculator shows the minimum depth a span calls for under residential loading, and the deck joist span calculator covers the outdoor case where a bouncing deck joist is the worry.
- Long-term creep. Wood under constant load slowly deflects further over the years, a behaviour the NDS accounts for with a creep factor of roughly 1.5 for dry lumber and 2.0 for unseasoned lumber, applied to the sustained-load part of the deflection. Those are design averages, not a prediction of how far your floor will drop.
- Moisture and rot. Decay fungi become active in framing once the wood's moisture content sits in the 20 to 30 percent range, so a joist near a leaking pipe, a damp crawl space, or a failed gutter can lose strength while looking sound on the surface. Punky or soft wood has lost far more capacity than its appearance suggests.
- Insect damage. Termites and other wood-boring insects hollow out joists, sills, and subflooring from the inside, usually over years of activity rather than in a sudden event. That slow timeline is why a regular look at the framing pays off.
- Over-cutting for pipes and cables. A joist notched or drilled too deeply for plumbing or wiring loses strength where it is cut. For solid-sawn joists the IRC limits a notch to one-sixth of the joist's depth and one-third of the depth in length, keeps notches out of the middle third of the span, and caps a bored hole at one-third of the depth, kept at least two inches from the edges. These fractions apply to sawn lumber only. Engineered I-joists and trusses must never be cut except as the manufacturer or an engineer allows, because even one small unauthorised hole can disqualify them.
- Added load. A tile or stone floor, a new partition wall, a re-purposed room, or a heavy appliance can push a floor past what its joists were sized for. How much extra weight an existing floor can carry is a question for an engineer, not a rule of thumb.
- A failed support below. Many problems that look like a sagging joist are really a sagging girder, a settled or rotted post, an undersized footing, or a foundation that has moved. This is the one-directional slope from the paragraph above, and it usually points to work beneath the floor rather than to the joists themselves.
Distance between bearing walls or beams, measured inside face to inside face.
Standard residential spacing is 16" OC. Tile floors often use 12" OC.
Grade No. 2 is the standard structural grade for residential framing.
IRC requires 40 PSF for habitable rooms, 30 PSF for sleeping rooms (some jurisdictions).
Weight of the floor assembly itself. Light: 10 PSF. Tile floor: 15-20 PSF.
For estimation only. Structural work requires review by a licensed engineer. Local building codes take precedence over any calculator output.
How This Is Calculated
Minimum joist size determined from AWC span tables based on species, grade (No. 2), spacing, and total load (live + dead). Span table values adjusted by spacing factor (12" OC = 1.08x, 16" = 1.0x, 19.2" = 0.95x, 24" = 0.88x). Deflection limit = span (in) / 360 for live load. Joist count per 10 ft = ceil((120 / spacing) + 1). Board feet = (2 x nominal depth / 12) x span x count.
Source: Maximum spans from AWC Span Tables for Joists and Rafters, 2024 edition. Reference design values per NDS 2024 Supplement Table 4A. Deflection limits per IRC 2021 Section R301.7 — L/360 for live load and L/240 for total load.
How Bad Is It? Measuring the Sag and Reading the Signs
Once you know roughly where the sag lives, the next job is to measure it and judge how serious it is, carefully, because the numbers below describe how floors are designed, not a threshold that condemns an existing one.
- Map where the floor sags. Walk the room and note whether it dips symmetrically at mid-span or slopes toward one line of support. The shape tells you whether to look at the joists or at the beam, post, and footing beneath them.
- Set a reference and measure. Stretch a tight string line across the span at a fixed height, or run a laser level, and measure the gap to the floor at several points. The largest gap, usually near mid-span, is the deflection. Re-measuring with a known weight placed at the low point shows whether the floor still moves under load.
- Inspect from below. From the basement or crawl space, look along each joist and its supports for rot, damp, insect tunnelling, over-cut notches, or a post or girder that has dropped. The cause you find here decides everything that follows.
- Look for the warning signs. Soft or crumbling wood, cracks that are widening, a slope that is worsening, or several joists dropping together all move the job out of DIY territory.
- Get a professional assessment. Have a licensed structural engineer judge the cause and whether the floor is adequate, and size any repair, before work begins.
To put a measurement in context, building codes design floors so the joists deflect no more than the span divided by 360 under live load (people and furniture), and no more than the span divided by 240 under the full load. For a 12-foot span, the live-load figure works out to about a third of an inch. But that is a design target for new framing, not a line that says an existing floor is failing code. A floor can sit a little outside a new-build design figure and stay perfectly stable, while a smaller sag that is still moving can be the real warning. Movement, soft wood, and spreading cracks tell you more than the slope on its own. The beam deflection calculator shows how span, load, and stiffness drive these figures for a beam you are checking, but reading them as a verdict on a specific in-service floor is an engineer's call.
Repair Approaches, and Where the DIY Line Sits
Repairs fall into a handful of approaches, each suited to a different cause. The common thread is that the concept is easy to understand, while the specifics, what size, how many fasteners, how far to lift, depend on the load and the condition of your floor. Those numbers belong to an engineer, not to a blog.
Fix the cause first. A repair that ignores why the joist sagged will fail again. If damp or a leak is the problem, stop the water and let the framing dry before anything else. If the floor is overloaded, the answer may be to take the load off rather than to beef up the frame. Rot and insect damage have to be dealt with at the source, not covered over.
Sistering. Sistering means fastening a new joist alongside the damaged one so the two act together. Done properly, the sister runs the full length of the joist, bears on the same supports at each end, and matches the original in depth and species so it carries its share. A sister that stops short of the bearing points, or is shallower than it should be, can fail to restore capacity even when it is well fastened along its length, which is a common and costly mistake. The size of the sister, the fastener type and spacing, and whether glue is needed all depend on the load and span, so confirm them with a structural engineer and your local building department rather than copying a pattern from a video. Engineered I-joists and built-up beams cannot be repaired with a plain timber sister; they need the manufacturer's repair detail or an engineer's design.
Adding support underneath. Where the joists are over-spanned, a new mid-span beam carried on posts shortens the distance each joist has to reach, which can bring an over-spanned floor back within the span tables. The catch is the load path. The posts have to land on footings sized for the weight they carry, not just rest on a slab, and the beam, posts, and footings all have to be sized for the actual load. The IRC sets minimums, such as a 12-inch-wide, 6-inch-deep footing and a 3-inch steel column, but a minimum is a floor under the design, not a guarantee that it suits your load. A permanent steel column must be a solid, code-rated type; a temporary adjustable screw jack is not a permanent support and should not be left in place. Whether the joist is even bearing on a wall that can take the load is worth checking too, and the load-bearing wall calculator helps you think that through before an engineer visits.
Jacking back toward level. A sag that took years to form is corrected slowly, lifting a sagged beam or joist in small increments over days or weeks while watching for new cracks and noises between turns. Lift too fast and you can crack plaster, split old dried-out framing, burst a water pipe, or rack the door frames above. The exact rate to lift is where the guidance falls apart: published figures run from a fraction of an inch per day to per month and differ by a factor of thirty between sources, none of them code. The safe increment for your structure is a judgment for an engineer, and over-jacking a floor can do more harm than leaving a stable sag alone.
Permits and When the Job Needs an Engineer
Structural repair is not free-for-all work. The IRC requires a permit before you alter, repair, or reinforce a structure, and its exemption for ordinary repairs specifically does not cover cutting away a load-bearing support or a structural beam. Sistering joists, adding a beam and posts, or changing how the load travels are alterations that commonly need a permit and an engineer-stamped design. The word there is commonly, because the local building authority, working from the code edition your area has adopted, decides where your particular job falls. That local determination always outranks a general guide.
The practical rule: if the work changes the load path, or follows the kind of structural failure flagged in the warning signs above, treat it as engineer-led from the start. A structural engineer's assessment costs a few hundred pounds or dollars and gives you a written specification of member sizes, bearing points, and connections that a builder can follow and an inspector can sign off. The same caution applies to the walls a floor bears on. If a sag traces back to a wall you are unsure about, the guide to telling whether a wall is load-bearing is the right next read before anyone removes or alters it.
Keeping a Floor From Sagging
Most sagging floors trace back to a few preventable conditions. Keeping framing dry is the big one: wood held below about 20 percent moisture content does not decay, so a dry crawl space, working gutters, and prompt attention to leaks protect the joists more than anything else. When running pipes and cables, stay inside the notching and boring limits, and never cut an engineered joist without the manufacturer's chart. Think twice before loading a floor with stone, tile, or a new wall it was not framed for, and when you build or renovate, size the joists for the real span and load rather than the cheapest board on the rack. A floor framed and kept right rarely sags at all.
When one does, the order of work is what keeps you safe. Read the shape of the sag, measure it, find the cause underneath, and judge honestly whether the signs put the job beyond a confident DIY repair. The members under your floor are holding up everything above them, there is no prize for guessing, and a structural engineer's assessment is cheap next to the cost of getting a load-bearing repair wrong.
Frequently Asked Questions
- Can you fix a sagging floor joist yourself?
It depends entirely on the cause and how serious it is. A minor, long-stable dip from an old, slightly over-spanned joist may be within a confident DIYer's reach once an engineer has confirmed the cause. Anything involving rot, a worsening slope, several affected joists, or a load-bearing member that is failing is not a DIY job, because getting the repair wrong can make the structure less safe. Start by checking whether the joist was ever sized for its span using the floor joist size calculator, then get a professional assessment before deciding.
- How do you sister a floor joist?
Sistering fastens a new joist alongside the damaged one so the pair acts as a single stronger member. The sister should run the full length of the joist, bear on the same supports at each end, and match the original in depth and species, often with structural adhesive in addition to mechanical fasteners. The size of the sister and the fastener type, spacing, and pattern are not universal; they depend on the load, the span, and the condition of the existing joist, so confirm them with a structural engineer and your local building department rather than copying a fixed schedule. If the sag is really excessive deflection in a beam, a beam deflection check shows how span and stiffness drive the numbers.
- When should you call a structural engineer for a sagging floor?
Call a licensed structural engineer whenever a sag comes with soft or rotted wood, cracks that are widening, a slope that is getting worse, foundation movement, or several joists dropping together. Call one too if you are simply unsure, because visual inspection can flag symptoms but cannot confirm whether a member is adequate or how much capacity it has left. The engineer judges the cause, decides whether the floor is safe, and specifies any repair, which protects you far more than a guess. The same logic applies before touching any wall the floor bears on, as the guide to whether a wall is load-bearing explains.
- Why does a floor dip in the middle but slope to one side elsewhere?
The shape of a sag points to its source. A symmetric dip that is deepest at mid-span usually means the joist itself is bending, often because it is over-spanned or has lost strength to rot or over-notching. A steady slope toward one line, such as a central beam or one wall, usually means a support under that line has dropped: a settled post, a sagging girder, or a foundation that has moved. Reading the shape tells you whether to look at the joists or at the supports below them, and the deck joist span calculator shows how span length drives how much a joist deflects in the first place.