Tile Adhesive Calculator
Free tile adhesive calculator for thin-set, mastic, and epoxy. Enter area, tile size, and substrate for quantity estimates with trowel and cost guidance.
Last updated:
Reviewed by Doc. dr. sc. Mladenka Juradin, dipl. ing. građ., PhD, Civil Engineering (FCEAG, University of Split)
Total surface area including walls or floors.
Larger tiles need deeper trowel notches and more adhesive per sq ft.
Thin-set for most floors; mastic for dry wall tile; epoxy for wet/commercial.
Rough substrates absorb more adhesive. Concrete may need a primer coat.
How This Is Calculated
Coverage rate (sq ft/bag) varies by trowel notch depth: small tiles 50, medium 40, large 30, extra-large 25. Mastic multiplier: ×1.1. Epoxy multiplier: ×0.75. Plywood substrate: ×0.9. Concrete substrate: ×0.85. Bags needed = area ÷ adjusted coverage rate, rounded up. Cost = bags × cost per unit.
Source: Coverage rates derived from Tile Council of North America (TCNA) Handbook and major thin-set manufacturer data sheets (Mapei, Laticrete, Custom Building Products).
7 min read
Thin-Set vs. Mastic vs. Epoxy: Which Adhesive Do You Need?
Choosing the wrong tile adhesive is one of the most common and most expensive tiling mistakes. Each type has a specific use case, and using the wrong one leads to tiles popping off walls, cracking underfoot, or failing in wet environments within months.
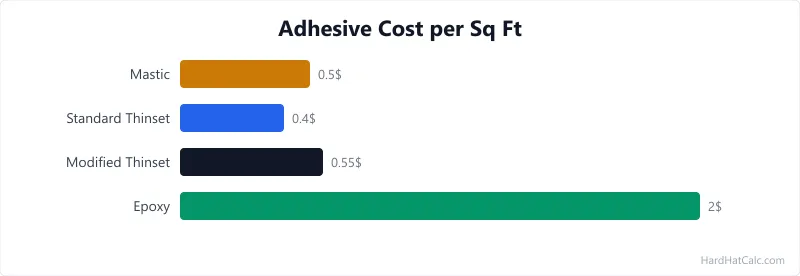
Thin-set mortar is the workhorse of the tile industry. It is a cement-based powder mixed with water (or a latex additive) on site. Thin-set bonds to nearly any substrate, handles floor and wall applications, and works in wet areas like showers and pool surrounds. Modified thin-set (with polymer additives) provides better flex and adhesion for large-format tiles and exterior installations. Unmodified thin-set is cheaper and required over certain waterproof membranes (like Schluter DITRA) because the membrane provides the flex — doubling up on polymer creates adhesion problems. Price: $12–$18 per 50-lb bag as of March 2026, US national averages.
Mastic (pre-mixed adhesive) is a latex-based, ready-to-use adhesive sold in buckets. It saves the mess and time of mixing but has strict limitations: mastic should only be used on dry interior walls. It is not rated for floors (it stays slightly flexible and can compress under foot traffic), not rated for wet areas (it dissolves back to paste when saturated), and not rated for large tiles (the initial grab is not strong enough to hold heavy tiles on vertical surfaces). Where it works — backsplashes, fireplace surrounds, light-duty wall tile — it is genuinely easier to use. Price: $25–$40 per 3.5-gallon bucket.
Epoxy adhesive is a two-part resin system that creates the strongest bond of the three. It is chemical-resistant, waterproof, and bonds to difficult substrates like metal, glass, and existing tile. Epoxy is standard for commercial kitchens, hospitals, swimming pools, and any application where chemical exposure or extreme hygiene standards apply. The trade-offs: it costs 3–4× more than thin-set, has a short working time (20–30 minutes before it starts to set), and requires careful mixing ratios. Mistakes are hard to undo once epoxy cures. Price: $50–$80 per unit.
How to Match Trowel Size to Tile Size
The trowel notch size controls how much adhesive ends up under each tile. Using too small a notch creates voids (hollow spots under the tile that crack under load). Using too large a notch wastes adhesive and can cause it to squeeze up through grout joints.
Tiles up to 6×6 inches: Use a 3/16-inch V-notch trowel. The V-shaped ridges collapse fully when the tile is pressed in, leaving a thin, even layer. A 50-lb bag of thin-set covers roughly 50 square feet at this notch depth.
Tiles 8×8 to 12×12 inches: Use a 1/4-inch square-notch trowel. The square ridges provide more adhesive volume than V-notches. At this size, back-buttering (applying a thin skim coat to the tile back in addition to the troweled substrate) is optional but improves coverage. Coverage drops to about 40 square feet per bag.
Tiles 13×13 to 18×18 inches: Use a 3/8-inch square-notch trowel. Large tiles require back-buttering — skip it and you risk hollow spots in the centre of each tile. Industry standard is 85% minimum adhesive contact for floor tiles, 95% for wet areas. Coverage: about 30 square feet per bag.
Tiles over 18×18 inches: Use a 1/2-inch square-notch trowel and back-butter every tile. Large-format tiles are heavy and flexible — any void in the adhesive bed becomes a stress point where the tile can crack. Many tile manufacturers require 95% adhesive coverage for warranty purposes, regardless of location. Coverage drops to about 25 square feet per bag.
Verify with the squeeze test. After setting a tile, pull it back up and check the adhesive contact. If less than 85% of the tile back and substrate are covered, increase your trowel size or apply adhesive more generously. This 30-second check on your first few tiles prevents an entire floor of hollow tiles.
Substrate Preparation and Its Effect on Adhesive Consumption
The substrate — the surface you are tiling over — has as much impact on adhesive consumption as the tile size. A rough, porous surface absorbs adhesive into its pores, reducing the bonding layer and increasing the amount you need. A smooth, sealed surface lets the adhesive sit on top, which can cause adhesion failure if the surface is too slick.
Cement board (brands like Hardie, Durock, and Permabase) is the ideal tile substrate. It has a consistent texture, does not warp with moisture, and bonds well with thin-set. Adhesive consumption on cement board tracks closely to the manufacturer's stated coverage rates. If you are building a shower or tub surround, cement board over studs is the standard approach — pair it with a waterproof membrane (liquid-applied or sheet) before tiling.
Plywood is an acceptable substrate for floor tile in dry areas, but it absorbs more adhesive than cement board and flexes under load. Use a minimum 3/4-inch exterior-grade plywood, and apply a crack isolation membrane over the plywood before tiling. The membrane absorbs flex that would otherwise crack grout joints and pop tiles. Adhesive consumption on plywood typically runs 10% higher than cement board, both because of absorption and because uneven spots in the plywood require extra thin-set to level.
Concrete slabs are the most variable substrate. New concrete that has cured for at least 28 days bonds well with thin-set after cleaning and priming. Old concrete may have curing compounds, paint, adhesive residue, or moisture issues that block adhesion. Grind or shot-blast the surface to expose fresh concrete. Concrete with a smooth troweled finish needs scarifying — the adhesive cannot grip a polished surface. Consumption on concrete can be 15% higher than cement board due to surface irregularities that fill with adhesive. If you are tiling over a newly poured slab, make sure the concrete reinforcement is adequate for the intended use before worrying about tile adhesive.
Coverage Rates and Waste Factors
The table below summarises expected coverage rates for thin-set mortar across common tile sizes and substrates. All figures assume proper trowel technique with full contact.
| Tile Size | Trowel Notch | Cement Board (sq ft/bag) | Plywood (sq ft/bag) | Concrete (sq ft/bag) |
|---|---|---|---|---|
| Up to 6×6 in | 3/16" V | 50 | 45 | 42 |
| 8×8 to 12×12 in | 1/4" square | 40 | 36 | 34 |
| 13×13 to 18×18 in | 3/8" square | 30 | 27 | 25 |
| Over 18×18 in | 1/2" square | 25 | 22 | 21 |
Add 10% to your calculated quantity for waste: adhesive that dries in the bucket, adhesive scraped off during trowel cleaning, and adhesive lost to mixing errors. If you are working outdoors in temperatures above 90°F, add 15% — heat accelerates drying and shortens the open time (the window between spreading and setting the tile).
For mastic, coverage rates are 10% higher than thin-set because it is applied in thinner layers. For epoxy, coverage rates are 25% lower because the thicker application layer compensates for the material's higher bond strength. Once the adhesive has cured, you will need to estimate grout quantities based on your tile size and joint width — grout consumption varies even more than adhesive consumption across tile formats.
Three Thin-Set Lessons from 9 PM Remodels
Tile adhesive seems straightforward until you are knee-deep in a bathroom remodel at 9 PM and the thin-set is setting faster than you can lay tile. A few lessons from hands-on experience:
Mix thin-set to peanut-butter consistency. Too thin and it sags on walls. Too thick and the trowel cannot form ridges. Mix in a 5-gallon bucket with a paddle mixer on a drill — hand mixing leaves dry lumps that create voids under tiles. Let the mix slake (rest) for 5–10 minutes after initial mixing, then remix briefly before use. Slaking allows the polymers to fully hydrate.
Never exceed the open time. Open time is the window between troweling adhesive onto the substrate and placing the tile. For most thin-sets, open time is 15–20 minutes in moderate conditions. If the adhesive has skinned over (formed a dry crust on the surface), scrape it off and re-trowel. Setting a tile onto skinned adhesive creates a weak bond that fails within months.
Budget for extra adhesive on your first project. Beginners use 15–25% more adhesive than experienced tilers because of technique — inconsistent trowel angles, re-troweling areas that dried, and mixing errors. Buy an extra bag and return the unopened one if you do not need it. Most big-box stores accept returns on unopened bags within 90 days.
If your tiling project is part of a larger renovation that includes ceiling painting, do the ceiling work before tiling. Paint drips on freshly laid tile are far more annoying than tile dust on a floor you have not tiled yet.
Worked Examples
Example 1
Scenario: A homeowner is tiling a 120 sq ft shower surround with 13×13 in tiles using thin-set mortar over cement board.
Calculation: Base coverage for large tiles = 30 sq ft/bag. Thin-set multiplier = 1.0. Cement board multiplier = 1.0. Adjusted coverage = 30 sq ft/bag. Bags needed = ⌈120 ÷ 30⌉ = 4 bags. Cost = 4 × $15 = $60.
What this means: The project requires 4 bags of 50-lb thin-set mortar at roughly $60 in material costs. Add 10% waste and buy a fifth bag.
Takeaway: Large tiles on cement board consume adhesive at a predictable rate — back-buttering each tile is essential to reach the 95% coverage required in wet areas.
Example 2
Scenario: A restaurant owner needs to tile a 500 sq ft commercial kitchen floor with 10×10 in porcelain using epoxy adhesive over a concrete slab.
Calculation: Base coverage for medium tiles = 40 sq ft/unit. Epoxy multiplier = 0.75. Concrete substrate multiplier = 0.85. Adjusted coverage = 40 × 0.75 × 0.85 = 25.5 sq ft/unit. Units needed = ⌈500 ÷ 25.5⌉ = 20 units. Cost = 20 × $65 = $1,300.
What this means: The kitchen floor requires 20 units of epoxy adhesive at approximately $1,300. Epoxy costs 4× more per unit than thin-set but is required for chemical resistance in commercial kitchens.
Takeaway: Concrete slabs and epoxy together reduce coverage by 36% compared to thin-set on cement board — budget accordingly or the project stalls mid-install.
Frequently Asked Questions
- Can I use mastic adhesive in a shower?
No. Mastic is water-soluble and will revert to paste when exposed to sustained moisture. Showers, tub surrounds, steam rooms, and any area with direct water contact require thin-set mortar or epoxy adhesive. Even areas near a shower — like the bathroom floor next to the tub — should use thin-set because splashing and humidity can soften mastic over time. This is the single most common adhesive mistake in DIY bathroom remodels. If you are waterproofing the shower walls first, the membrane calculator sizes the barrier before you choose an adhesive.
- What is the difference between modified and unmodified thin-set?
Modified thin-set contains polymer additives (usually latex or acrylic) that improve flexibility, adhesion, and water resistance. Unmodified thin-set is pure cement and sand with no polymers. Use modified thin-set for most applications: large tiles, exterior work, and any substrate that benefits from stronger adhesion. Use unmodified thin-set specifically over uncoupling membranes like Schluter DITRA — the membrane provides flexibility, and doubling up on polymers can trap moisture between layers, preventing proper curing. The thinset calculator goes deeper into modified vs unmodified bag counts by trowel notch size.
- How long does tile adhesive take to cure before grouting?
Thin-set mortar needs 24 hours minimum before grouting under normal conditions (65–75°F, 50% humidity). In cold or humid conditions, extend to 48 hours. Mastic needs 24–48 hours. Epoxy cures faster — usually 8–12 hours — but check the manufacturer data sheet for your specific product. Walking on floor tiles before the adhesive cures can shift tiles and break the bond, so plan your exit route before starting a floor installation. Once the adhesive sets, the grout calculator estimates bags by joint width and tile size.
- How much extra tile adhesive should I buy for waste?
Add 10% to your calculated quantity for normal waste. If you are tiling in hot weather (above 90°F), working with extra-large format tiles, or this is your first tile project, add 15–20% instead. Unused unopened bags of thin-set can be returned to most retailers, so it costs nothing to have a spare on hand. An opened bag of thin-set has a shelf life of about 1 year if kept dry and sealed — after that, the cement absorbs moisture from the air and loses bonding strength. The shelf-life and storage guide compares shelf life and storage tips across product families.
More Materials calculators
Browse all materials calculators — Paint coverage, roofing bundles, tile adhesive, welding time, parking lot sizing, and more.