Waterproofing Membrane Calculator
Estimate waterproofing membrane calculator quantities for foundation walls. Get roll counts, primer, and drainage board for SBS, HDPE, or liquid systems.
Last updated:
Reviewed by Doc. dr. sc. Bojan Milovanović, dipl. ing. građ., PhD, Civil Engineering (FCE, University of Zagreb)
Total exterior foundation wall area to be waterproofed. Multiply perimeter by wall height.
SBS peel-and-stick is the most common residential choice. HDPE dimpled sheets double as drainage. Liquid-applied works best on irregular surfaces.
Drainage board (geocomposite) protects the membrane and channels water to the footing drain. Recommended for all below-grade applications.
Height of the foundation wall from footing to grade. Standard full basement is 8 ft; crawl space is 3-4 ft.
Inside and outside corners need extra membrane for reinforcing strips. A rectangular foundation has 4 corners.
How This Is Calculated
Membrane area = wall area × overlap factor + (corners × 2 sq ft). Rolls or pails = membrane area / coverage per unit. Primer gallons = wall area / coverage per gallon (SBS: 200 sq ft/gal, liquid: 300 sq ft/gal; none for HDPE). Drainage board sheets = wall area × 1.05 / 200 sq ft per sheet. Total cost = membrane cost + primer cost + drainage board cost.
Source: Membrane coverage and overlap factors per ASTM D6163 (Standard Specification for SBS Modified Bituminous Sheet Waterproofing). Drainage board sizing per ICC-ES AC 29 (Acceptance Criteria for Below-Grade Waterproofing). Primer coverage rates and material costs from manufacturer technical data sheets (Carlisle CCW, Henry Company, GCP Bituthene).
10 min read
Sizing a Below-Grade Waterproofing System Step by Step
Foundation waterproofing is not the same as damp-proofing. Damp-proofing (a thin asphaltic spray coat) resists moisture vapour but cannot withstand hydrostatic water pressure. True waterproofing — using sheet membranes, liquid-applied coatings, or drainage composites — bridges cracks, resists standing water, and remains flexible as the foundation settles. Getting the quantity right prevents both shortages mid-project and expensive surplus that cannot be returned once opened.
Measure the foundation perimeter and wall height. Walk the exterior of the excavated foundation and measure each wall segment. Multiply total perimeter (linear feet) by the wall height from the top of the footing to the finished grade line. A 40 ft × 30 ft basement with 8 ft walls has a perimeter of 140 ft and a wall area of 1,120 sq ft. Include any step-downs where the footing drops to accommodate a garage or walkout — measure each section at its own height.
Choose the membrane system based on site conditions. SBS modified bitumen peel-and-stick sheets are the residential standard: they self-seal around fastener penetrations and bond permanently to primed concrete. HDPE dimpled membranes are the budget option and double as a drainage plane, but they rely on mechanical fastening at the top edge rather than adhesive bonding. Liquid-applied systems (polyurethane or rubberised asphalt) are best for irregular surfaces, elevator pits, and walls with many penetrations because they form a seamless coat with no lap joints.
Add the overlap and waste factor. Sheet membranes require 3-4 inch side laps and 6 inch end laps, which adds roughly 10% to the net wall area. Liquid-applied products lose 10-15% to roller waste, drips, and building up extra thickness at inside corners and footing-to-wall joints. Count each corner as 2 sq ft of extra membrane for reinforcing strips that prevent cracking at the bend.
Calculate primer quantity. SBS peel-and-stick membranes require a solvent-based or water-based primer on all concrete surfaces before application. Primer coverage runs about 200 sq ft per gallon on smooth poured concrete and 150 sq ft per gallon on rough block. HDPE sheets do not need primer because they are mechanically attached. Liquid-applied systems use a lighter primer at roughly 300 sq ft per gallon.
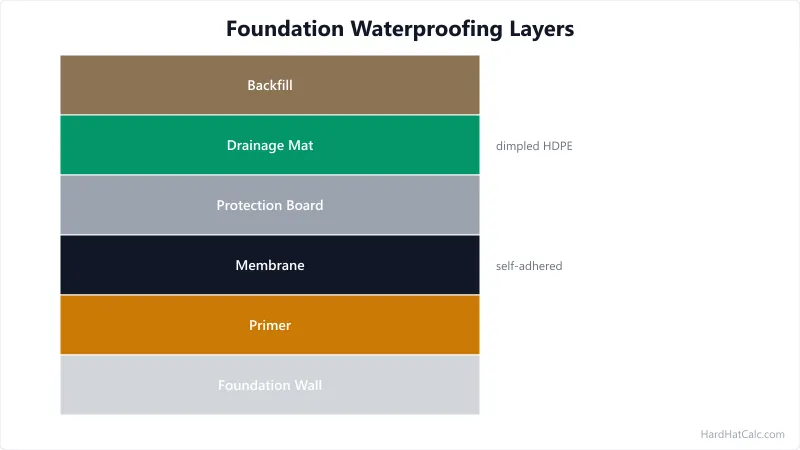
Size the drainage board. A geocomposite drainage board (dimpled HDPE core with filter fabric) sits outboard of the membrane and channels groundwater down to the perimeter footing drain. Coverage matches the wall area with a 5% overlap. Standard sheets are 4 ft × 50 ft (200 sq ft). Every below-grade waterproofing installation should include drainage board — it protects the membrane from backfill damage and prevents hydrostatic pressure from building against the wall. For the foundation wall structure itself, the concrete block wall cost calculator estimates block, mortar, and rebar quantities.
SBS Sheet vs. HDPE Dimpled vs. Liquid-Applied: Which System Fits Your Project
The three main below-grade waterproofing systems serve different budgets, site conditions, and performance requirements. Picking the wrong one wastes money or — worse — lets water into the basement.
SBS modified bitumen peel-and-stick is the most reliable residential waterproofing membrane. The sheet is a rubberised asphalt compound laminated to a polyethylene carrier film, typically 60 mil thick. You peel the release liner, press the sticky face against the primed concrete, and roll it with a hand roller to ensure full contact. The material self-seals around minor punctures and fastener penetrations because the bitumen compound flows under pressure. Lap joints are self-adhering — the factory edge overlaps the adjacent sheet and bonds without additional adhesive. SBS sheets cost $0.90-$1.40 per sq ft and require a compatible primer ($35-$55 per gallon). Brands to look for: Carlisle CCW MiraDRI, Henry Blueskin WP200, GCP Bituthene. The main limitation is surface preparation — SBS will not bond to wet, dusty, or honeycombed concrete. The wall must be dry, clean, and primed within 24 hours of application.
HDPE dimpled membrane is a thick polyethylene sheet with raised studs that create an air gap between the membrane and the foundation wall. Water that reaches the wall face drains down through the air gap channels to the footing drain without ever touching the waterproofing layer. HDPE costs $0.45-$0.75 per sq ft and needs no primer — it fastens to the wall with a termination bar and concrete screws along the top edge. The downside is that HDPE is not a true bonded waterproofing membrane. If water gets behind the top termination bar or rises above the membrane, it flows down the channels and into the basement rather than being stopped at the wall face. HDPE works well as a drainage layer outboard of a bonded membrane, but using it alone only suits low-water-table sites where the primary concern is soil moisture rather than hydrostatic pressure.
Liquid-applied waterproofing (spray-grade or roller-grade polyurethane or rubberised asphalt) forms a seamless monolithic coating that conforms to every surface irregularity. There are no laps, no joints, and no voids — the coating bridges cracks up to 1/16 inch and flexes with seasonal foundation movement. Liquid-applied systems cost $1.20-$1.80 per sq ft in materials and require a primer coat. Application demands careful thickness control: most products specify 60 mil wet film thickness (about 40 mil dry), applied in two passes. Going too thin leaves pinholes; going too thick causes sagging and curing defects. Liquid-applied is the professional's choice for elevator pits, complex geometries, and walls with dense pipe or conduit penetrations where sheet products would need dozens of patches. To understand how insulation layers interact with waterproofing on foundation walls, the spray foam insulation cost calculator covers closed-cell foam applied directly to the interior face.
Material Costs for Below-Grade Waterproofing Systems
Material prices vary by region, supplier, and order size. The table below reflects US national averages as of March 2026, sourced from distributor pricing and contractor surveys. Labour is not included — professional installation adds $2.50-$5.00 per sq ft for sheet systems and $3.00-$6.00 per sq ft for liquid-applied.
| Component | Unit | Cost Range | Midpoint Used | Notes |
|---|---|---|---|---|
| SBS peel-and-stick membrane (60 mil) | per sq ft | $0.90-$1.40 | $1.15 | Carlisle, Henry, GCP. Price per roll varies by brand. |
| HDPE dimpled membrane (20-24 mil) | per sq ft | $0.45-$0.75 | $0.60 | Delta-MS, DMX, Superseal. Cheaper than bonded systems. |
| Liquid-applied membrane (polyurethane) | per sq ft | $1.20-$1.80 | $1.50 | Carlisle CCW-702, Tremco Paraseal LG. Two-coat application. |
| SBS primer (solvent or water-based) | per gallon | $35-$55 | $45 | Covers 200 sq ft/gal on smooth concrete. |
| Liquid-applied primer | per gallon | $30-$50 | $40 | Covers 300 sq ft/gal. Lighter formula than SBS primer. |
| Drainage board (geocomposite, 1 in core) | per sq ft | $0.55-$0.85 | $0.70 | 4 ft × 50 ft rolls. Filter fabric bonded to dimpled core. |
| Termination bar (aluminium, 10 ft lengths) | per foot | $0.80-$1.50 | $1.10 | Secures top edge of membrane and drainage board. |
| Mastic/detail sealant | per tube | $8-$15 | $11 | For pipe penetrations, termination edges, and patches. |
SBS membrane rolls typically contain 200 sq ft (3 ft wide × 66.7 ft long). HDPE rolls contain 150 sq ft (6 ft wide × 25 ft long). Liquid-applied pails contain 5 gallons, covering roughly 200 sq ft at the specified film thickness. Drainage board comes in 200 sq ft rolls (4 ft × 50 ft).
Buy 10% extra membrane and one extra pail of primer beyond the calculated quantity. Below-grade work is unforgiving — if you run short mid-application, the exposed primer coat picks up dust and moisture while you wait for the supply house to open the next morning, and you may need to re-prime. The thermal performance of the wall above the waterproofing layer matters for energy code compliance — the composite R-value tool computes composite R-values for block walls with insulation and furring.
Common Failures and What Causes Them
Below-grade waterproofing failures are expensive because the membrane is buried. Diagnosing the leak requires excavation, and repair means re-doing work that should have lasted the life of the building. Most failures trace back to five causes, all preventable.
Skipping the primer. SBS peel-and-stick membrane depends on a chemical bond between the bitumen adhesive and the concrete substrate. Without primer, the membrane sticks initially but peels away within 1-3 years as groundwater cycles wet and dry the concrete face. I learned this the hard way during renovation work on my Northumberland house — a previous owner had applied self-adhering membrane without primer on one section of the stone foundation. It had delaminated completely along the bottom 2 feet where water pressure was highest, and the only fix was excavation and full re-application with proper prep.
Poor surface preparation. Honeycombed concrete, form-tie holes, and sharp protrusions puncture sheet membranes and create pinholes in liquid coatings. The wall must be parged smooth with a thin coat of morite or non-shrink grout before membrane application. Projecting form ties should be snapped off and sealed with mastic. Dust, dirt, and efflorescence must be wire-brushed and blown clean. On block walls, fill the mortar joints flush and parge the entire surface to eliminate voids that trap air bubbles under the membrane.
Inadequate lap sealing. Sheet membrane side laps should overlap 3-4 inches, with the upper sheet overlapping the lower sheet so water sheds over the joint rather than into it. End laps need 6 inches of overlap. Each lap must be rolled firmly with a hand roller — especially in cold weather when the bitumen adhesive is less tacky. Laps that are not fully bonded peel open under hydrostatic pressure, creating a direct water path.
No protection during backfill. Raw membrane — even tough SBS or HDPE — gets punctured by rocks, gravel, and construction debris during backfill. Drainage board serves double duty as both a water management layer and a protection board. Without it, every sharp stone in the backfill is a potential leak. Some builders substitute rigid insulation board (XPS) as the protection layer, which adds thermal performance but costs more than geocomposite drainage board.
Neglecting the footing-to-wall joint. The cold joint where the foundation wall sits on the footing is the highest-risk location for water entry. The wall and footing are poured at different times, creating a construction joint that is never watertight on its own. The membrane must lap from the wall face down over this joint and onto the footing by at least 4 inches. A cant strip (triangular bead of mastic or mortar) at the inside corner eases the membrane over the 90-degree bend without bridging — unsupported bridging leaves an air gap that water pressure collapses, breaking the membrane seal.
Below-Grade Waterproofing Questions Answered
Foundation waterproofing generates questions because the work is buried and mistakes take years to show up. The answers below address the most common decision points for homeowners and contractors planning a below-grade job.
What is the difference between waterproofing and damp-proofing a foundation? Damp-proofing is a thin asphaltic spray (typically 10-15 mil) applied to the exterior of foundation walls to resist soil moisture vapour. It cannot bridge cracks, withstand hydrostatic pressure, or remain flexible as the foundation moves. Building codes require damp-proofing as a minimum on habitable basements (IRC R406.1), but it is not waterproofing. True waterproofing uses a membrane (sheet or liquid-applied, 40-60 mil thick) that resists standing water, bridges cracks up to 1/16 inch, and bonds to the substrate to prevent water migration behind the membrane.
Does an interior waterproofing system make exterior membrane unnecessary? Interior systems (drain tile, sump pump, vapour barriers on walls) manage water that has already entered the wall — they do not stop it from getting in. Exterior membrane prevents water from reaching the concrete in the first place, which protects the rebar from corrosion and the concrete from freeze-thaw spalling. The ideal approach uses both: exterior membrane to stop bulk water, drainage board to relieve hydrostatic pressure, and interior drain tile with a sump pump as a backup for any water that reaches the footing level.
How long does below-grade waterproofing membrane last? SBS modified bitumen membranes have a documented service life of 30-50 years when properly applied with primer on clean, dry concrete and protected by drainage board during backfill. HDPE dimpled sheets last indefinitely because polyethylene does not degrade underground, but the mechanical fastening at the top edge is the weak point — if the termination bar seal fails, water bypasses the membrane. Liquid-applied polyurethane coatings last 25-40 years depending on film thickness and substrate preparation.
Can you waterproof a foundation from the inside? Interior coatings (crystalline waterproofing, cementitious coatings) can reduce moisture vapour transmission through poured concrete walls, but they cannot withstand hydrostatic pressure from the soil side. The water pressure pushes the coating off the wall over time. For existing basements where exterior excavation is impractical, interior injection of polyurethane or epoxy into active cracks is a targeted repair method, but it addresses individual cracks rather than the full wall surface. True waterproofing belongs on the positive (water-facing) side of the wall.
Worked Examples
Example 1
Scenario: A homeowner in Pennsylvania is waterproofing a full basement with SBS peel-and-stick membrane. The foundation is 40 ft × 30 ft with 8 ft walls (140 linear feet of perimeter, 4 corners). Drainage board is included.
Calculation: Wall area = 140 × 8 = 1,120 sq ft. Membrane area = 1,120 × 1.10 overlap + 4 corners × 2 = 1,240 sq ft. Rolls = 1,240 / 200 = 6.2 → 7 rolls. Primer = 1,120 / 200 = 5.6 gallons. Drainage board = 1,120 × 1.05 / 200 = 5.88 → 6 sheets. Membrane cost = 1,240 × $1.15 = $1,426. Primer cost = 5.6 × $45 = $252. Drainage board cost = 1,176 × $0.70 = $823. Total material cost = $2,501. Cost per sq ft = $2,501 / 1,120 = $2.23.
What this means: Seven rolls of SBS membrane, 6 gallons of primer, and 6 sheets of drainage board cover this full basement perimeter at a material cost of roughly $2,500. This is the material bill only — professional installation adds $2.50-$5.00 per sq ft for labour, bringing the total installed cost to $5,300-$8,100 for this foundation.
Takeaway: SBS peel-and-stick membrane with drainage board is the standard residential waterproofing assembly and runs $2.00-$2.50 per sq ft in materials. The primer is a critical step that many DIY guides skip — without it, the bitumen sheet will not bond to the concrete and will peel away within a few years.
Example 2
Scenario: A contractor is waterproofing the interior of a 200 sq ft elevator pit with liquid-applied membrane at 10 ft depth. Four corners, with drainage board for hydrostatic pressure relief.
Calculation: Wall area = 200 sq ft. Membrane area = 200 × 1.15 + 4 × 2 = 238 sq ft. Pails (5-gal) = 238 / 200 = 1.19 → 2 pails. Primer = 200 / 300 = 0.7 gallons. Drainage board = 200 × 1.05 / 200 = 1.05 → 2 sheets. Membrane cost = 238 × $1.50 = $357. Primer cost = 0.7 × $40 = $28. Drainage board cost = 210 × $0.70 = $147. Total material cost = $532. Cost per sq ft = $532 / 200 = $2.66.
What this means: Two pails of liquid-applied membrane, one gallon of primer, and two drainage board sheets handle this small elevator pit for about $530 in materials. Liquid-applied products are the right choice here because the tight space and numerous penetrations (sump pit, hydraulic lines) make sheet membrane difficult to fit without wrinkles and voids.
Takeaway: Elevator pits and small irregular spaces are where liquid-applied waterproofing earns its premium over sheet membranes. The ability to spray or roll a seamless coating around pipes, sump pits, and corners eliminates the lap joints that are the most common failure point in sheet systems below grade.
Frequently Asked Questions
- How much does below-grade waterproofing membrane cost per square foot?
SBS peel-and-stick membrane runs $0.90-$1.40 per sq ft for the membrane alone, plus $0.18-$0.28 per sq ft for primer. HDPE dimpled membrane costs $0.45-$0.75 per sq ft with no primer needed. Liquid-applied polyurethane runs $1.20-$1.80 per sq ft plus primer. Adding drainage board ($0.55-$0.85 per sq ft) brings the total material cost for a full system to $1.60-$2.80 per sq ft depending on the membrane type. Professional installation adds $2.50-$6.00 per sq ft for labour, site prep, and backfill. These are US averages as of March 2026. For the foundation wall itself, the block wall cost calculator estimates CMU and mortar before you waterproof.
- Do you need drainage board with a waterproofing membrane?
Drainage board is strongly recommended for every below-grade waterproofing installation, though not always code-required. It serves two purposes: it protects the membrane from puncture damage during backfill, and it channels groundwater down to the footing drain before hydrostatic pressure builds against the membrane. Without drainage board, rocks and debris in the backfill material can puncture even thick SBS membranes, and sustained water pressure against the wall finds any imperfection in the membrane application. The added cost of $0.55-$0.85 per sq ft is cheap insurance against a $10,000+ basement leak repair. A tool to work out footing volume can help verify footing drain placement alongside the footing itself.
- How many rolls of waterproofing membrane do I need for a basement?
Calculate your foundation wall area (perimeter in feet × wall height in feet), add 10% for lap overlaps and waste, then divide by the coverage per roll. Standard SBS peel-and-stick rolls cover 200 sq ft (3 ft × 66.7 ft). A typical 40 ft × 30 ft basement with 8 ft walls has 1,120 sq ft of wall area, which becomes 1,240 sq ft after overlap. That requires 7 rolls of SBS membrane. Always round up — you cannot splice a partial roll cleanly, and leftover material is useful for patching penetrations. After waterproofing, the interior-insulation sizing tool shows how much insulation the interior side needs to meet code.
- Can I apply waterproofing membrane myself or do I need a contractor?
SBS peel-and-stick membrane is the most DIY-friendly option because the application is straightforward: prime the wall, peel the backing, stick the sheet, roll it flat. HDPE dimpled membrane is even simpler — fasten the termination bar and unroll. Liquid-applied systems are harder to apply at consistent thickness and typically require spray equipment for large areas. The critical skill is surface preparation, not the membrane application itself. If the concrete is smooth, clean, dry, and properly primed, a homeowner with patience can handle SBS or HDPE. Liquid-applied is better left to experienced applicators who can maintain the 60 mil wet film thickness specification. For interior moisture control on the other side of the wall, the vapor barrier calculator estimates poly sheeting and tape.
More Materials calculators
Browse all materials calculators — Paint coverage, roofing bundles, tile adhesive, welding time, parking lot sizing, and more.