Grout Calculator
Free grout calculator for sanded, unsanded, and epoxy grout. Enter tile size, joint width, and area to estimate bags needed with coverage rates and costs.
Last updated:
Reviewed by Doc. dr. sc. Mladenka Juradin, dipl. ing. građ., PhD, Civil Engineering (FCEAG, University of Split)
Total tiled area. Grout fills joints, not the tile surface.
Length of one tile in inches.
Width of one tile in inches.
Thickness of the tile edge — sets the depth of the grout joint.
Width of the gap between tiles. 1/16" to 1/8" is standard for rectified tile.
Sanded for wider joints, unsanded for narrow joints, epoxy for wet/commercial use.
How This Is Calculated
Joint volume per sq ft = ((tile length + tile width) / (length × width)) × tile thickness × joint width × 144. Total volume = area × volume per sq ft × 1.1 waste. Bags = total volume ÷ yield per bag (sanded 150 cu in, unsanded 120 cu in, epoxy 100 cu in).
Source: Grout volume formula from TCNA Handbook for Ceramic, Glass, and Stone Tile Installation. Coverage yields from Laticrete, Mapei, and Custom Building Products grout data sheets.
7 min read
Grout Coverage by Tile Size and Joint Width
Grout consumption depends on three tile-specific dimensions: tile size (which sets the linear feet of joints per square foot), tile thickness (which sets the joint depth), and joint width. Smaller tiles, thicker tiles, and wider joints all increase consumption.
The table below shows approximate coverage for a 25-lb bag of sanded grout across common tile and joint combinations. All figures assume ⅜-inch tile thickness and include 10% waste.
| Tile Size | 1/16" Joint | 1/8" Joint | 3/16" Joint | 1/4" Joint |
|---|---|---|---|---|
| 2×2 in (mosaic) | 50 sq ft | 25 sq ft | 17 sq ft | 13 sq ft |
| 4×4 in | 100 sq ft | 50 sq ft | 33 sq ft | 25 sq ft |
| 6×6 in | 150 sq ft | 75 sq ft | 50 sq ft | 38 sq ft |
| 12×12 in | 250 sq ft | 121 sq ft | 83 sq ft | 63 sq ft |
| 18×18 in | 340 sq ft | 170 sq ft | 113 sq ft | 85 sq ft |
| 24×24 in | 450 sq ft | 225 sq ft | 150 sq ft | 113 sq ft |
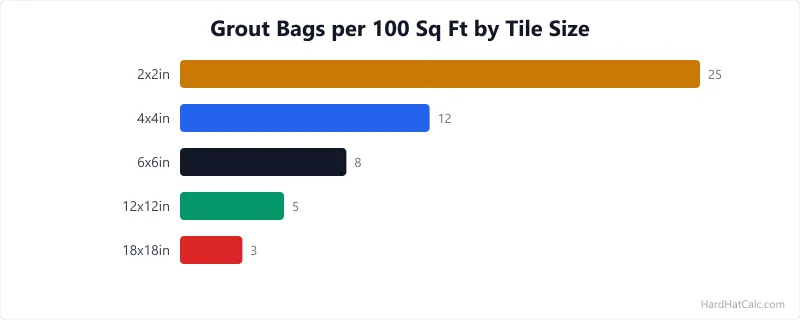
Mosaic tiles consume 5–10 times more grout per square foot than large-format tiles. A 50 sq ft shower floor covered in 2×2-inch mosaics with ⅛-inch joints needs 2 bags of grout — the same area in 18×18-inch tiles would not even use a third of one bag. Factor this into your material budget, especially if the project mixes tile sizes across different areas.
For unsanded grout, reduce the coverage figures by about 20% — finer particles pack denser and have less volume per pound. For epoxy grout, reduce by about 35% due to the denser resin matrix.
Mixing and Applying Grout Without Streaks
Grouting looks simple until you are standing in a half-finished bathroom at midnight wondering why the grout keeps pulling out of the joints. These steps produce clean, consistent joints on the first pass.
Wait for the thinset to cure. Do not grout until the thinset beneath the tiles has set for at least 24 hours (48 hours in cold or humid conditions). Walking on tiles before the adhesive cures shifts them out of position, and grouting too early traps moisture in the thinset layer.
Mix grout to thick peanut-butter consistency. Add powder to water, not water to powder. Use a margin trowel or paddle mixer on low speed. The mix should hold a shape when squeezed and not flow off the float. Let it slake (rest) for 5–10 minutes, then remix briefly without adding water.
Apply with a rubber float at 45 degrees. Scoop grout onto the float and press it into joints at a 45-degree angle to the tile. Work diagonally across the joint lines — parallel strokes pull grout out of the joints instead of pushing it in. Pack each joint completely, scraping excess off the tile surface in the same diagonal motion.
Clean within 15–20 minutes. Use a damp (not wet) sponge with rounded edges to wipe excess grout from the tile surface. Rinse the sponge frequently in clean water. Waiting too long lets the grout haze harden on the tile — it takes commercial-grade haze remover to get it off after a few hours. Cleaning too soon pulls grout from the joints.
Do a final polish with a dry cloth after 2–3 hours. Once the grout has firmed up, buff the tile surface with a dry microfibre cloth to remove the remaining haze. If any haze persists, a white vinegar solution (1:1 with water) works on cement-based grout. Do not use vinegar on epoxy grout — it will not help and may discolour the resin.
Seal sanded and unsanded grout after 72 hours. Cement-based grout is porous and stains easily. Apply a penetrating sealer (not a topical coating) after the grout has fully cured. Most sealers last 1–3 years before needing reapplication. Epoxy grout does not need sealing — the resin is non-porous by nature.
Joint Width Controls Grout Use, Strength, and Appearance
Joint width is the single biggest variable in grout consumption and in the finished appearance of a tile installation. A ⅛-inch joint uses twice the grout of a 1/16-inch joint, and a ¼-inch joint uses four times as much. But joint width is not just about aesthetics or material cost — it affects structural performance.
Narrow joints (1/16 to 1/8 inch) create a cleaner, more modern look. They require rectified (precision-ground) tiles with consistent dimensions. Non-rectified tiles have slight size variations from the kiln — pressing them together with narrow joints creates lippage (one edge sitting higher than the adjacent tile). Narrow joints work best with unsanded grout because the sand particles in sanded grout cannot fit into gaps smaller than ⅛ inch.
Standard joints (⅛ to 3/16 inch) accommodate slight tile size variations and work with both rectified and non-rectified tiles. This is the sweet spot for most residential floor and wall installations. Sanded grout fills these joints cleanly and has better strength than unsanded grout in this width range — the sand particles act as aggregate, the same way gravel strengthens concrete.
Wide joints (¼ inch and above) are used for rustic tile, hand-made tile, Saltillo, and stone where irregular edges prevent tight joints. Wide joints require sanded grout and consume roughly twice the material per square foot compared to standard joints. The trade-off is forgiving installation — wide joints hide tile size variations, simplify layout, and give the tile adhesive more room for adjustment during setting.
Before committing to heavy tile with wide joints, confirm that your floor joists can handle the combined weight of tile, adhesive, grout, and backer board — large-format porcelain with thick sanded joints adds 15–20 lbs per square foot.
Grout colour also affects perception. Contrasting grout (white grout with dark tile, or dark grout with light tile) emphasises the grid pattern and shows every joint imperfection. Matching grout colour to the tile blends the joints into the field and hides minor width variations. For large areas where uniform joints are difficult — especially with hand-set tile — matching grout colour is the practical choice.
Sanded vs. Unsanded vs. Epoxy Grout
Each grout type has a specific use case. Mixing them up leads to cracking, staining, or premature failure.
Sanded grout is cement-based with fine sand aggregate. The sand gives it strength and reduces shrinkage in wide joints. Use sanded grout for any joint wider than ⅛ inch, which covers most floor tile, outdoor tile, and standard wall tile installations. Sanded grout is the cheapest option at $12–$18 per 25-lb bag (March 2026 US averages) and the easiest to work with. The downside: it is porous, stains without sealing, and the sand particles can scratch polished marble, glass tile, and other soft or glossy surfaces.
Unsanded grout is cement-based without sand. It is smoother, less likely to scratch delicate tile surfaces, and packs cleanly into narrow joints (1/16 to ⅛ inch). Use unsanded grout for wall tile with tight joints, polished marble, glass mosaics, and any joint too narrow for sand particles to fill properly. Unsanded grout shrinks more than sanded grout in wide joints — anything wider than ⅛ inch develops hairline cracks as the cement cures. Price: $14–$20 per 25-lb bag.
Epoxy grout is a two-part resin system with no cement. It is waterproof, stain-proof, chemical-resistant, and does not need sealing. Use epoxy grout for shower floors, commercial kitchens, pool surrounds, and anywhere that hygiene or chemical exposure matters. The trade-offs: epoxy costs 3–4 times more than cement grout, has a short working time (30–45 minutes), requires precise mixing ratios, and is very difficult to clean off tile surfaces once it starts to set. If you have never used epoxy grout, practice on a small test area before committing to a full room. Price: $40–$65 per unit.
For most residential projects, sanded grout plus a penetrating sealer provides the best balance of cost, durability, and appearance. Epoxy grout is overkill for a dry-area floor but worth the cost where chemical exposure or constant water immersion would degrade cement grout.
Four Grouting Lessons from DIY Tile Jobs That Went Wrong
Grouting is the final step in a tile job and one of the most common places for DIY projects to go visibly wrong. A few lessons from hands-on renovation work:
Temperature matters. Grout cures by hydration, same as concrete. Below 50°F, curing slows dramatically and the grout stays soft and weak. Above 90°F, the grout sets too fast in the bucket and on the wall, leaving you with chalky, crumbly joints. Work in the 60–80°F range whenever possible.
Do not skip sealing. Unsealed cement grout absorbs stains within days. Coffee, wine, grease, and even tap water with high mineral content will discolour unsealed grout permanently. Sealing takes 30 minutes per room and costs under $20 in materials. Regrouting a stained floor takes a full weekend and a grout removal tool.
Buy extra colour-matched grout. If you ever need to repair a cracked joint, matching the colour of old grout with a new batch is nearly impossible. Dye lots shift, and cured grout always looks different from the wet colour on the bag. Buy one extra bag, label it with the room and date, and store it sealed in a dry location. Opened bags of grout last about a year.
Mosaic tiles eat grout. A 2×2-inch mosaic floor has roughly 8 times more linear joint footage per square foot than 12×12-inch tiles. The grout bill for a mosaic shower floor can exceed the thinset bill — budget accordingly and plan your mixing batches to avoid waste. If you are tiling over plywood subfloor, adding a crack isolation underlayment before setting tile protects grout joints from flex cracking as the subfloor moves.
Worked Examples
Example 1
Scenario: A homeowner is grouting a 50 sq ft bathroom floor with 12×12-inch tiles, ⅜-inch thick, using sanded grout with ⅛-inch joints.
Calculation: Joint volume per sq ft = ((12 + 12) / (12 × 12)) × 0.375 × 0.125 × 144 = (24/144) × 0.375 × 0.125 × 144 = 0.167 × 0.375 × 0.125 × 144 = 1.125 cu in/sq ft. Total raw volume = 50 × 1.125 = 56.25 cu in. With 10% waste = 61.9 cu in. Bags = ⌈61.9 ÷ 150⌉ = 1 bag. Coverage rate = 150 ÷ (1.125 × 1.1) = 121 sq ft/bag. Cost = 1 × $15 = $15.
What this means: A single 25-lb bag of sanded grout covers this 50 sq ft bathroom with room to spare. At 121 sq ft per bag coverage, 12×12 tiles with ⅛-inch joints use very little grout per square foot because the large tiles mean fewer joint lines.
Takeaway: Large tiles with narrow joints use surprisingly little grout. Buy one bag and you will have plenty left over — sealed grout powder stores for up to a year if kept dry.
Example 2
Scenario: A contractor is grouting 30 sq ft of kitchen backsplash with 3×6 subway tiles (¼-inch thick) using unsanded grout at 1/16-inch joints.
Calculation: Joint volume per sq ft = ((6 + 3) / (6 × 3)) × 0.25 × 0.0625 × 144 = (9/18) × 0.25 × 0.0625 × 144 = 0.5 × 0.25 × 0.0625 × 144 = 1.125 cu in/sq ft. Total raw volume = 30 × 1.125 = 33.75 cu in. With 10% waste = 37.1 cu in. Bags = ⌈37.1 ÷ 120⌉ = 1 bag. Cost = 1 × $17 = $17.
What this means: One bag of unsanded grout handles this backsplash. Despite the small tiles creating more joint lines per square foot, the narrow 1/16-inch joints and thin tiles keep volume low.
Takeaway: Subway tile backsplashes use unsanded grout because the 1/16-inch joints are too narrow for sand particles. Sanded grout in joints under ⅛ inch scratches the tile surface during application and cannot pack fully into the narrow gap.
Frequently Asked Questions
- What is the difference between sanded and unsanded grout?
Sanded grout contains fine sand particles that act as aggregate, reducing shrinkage and adding strength. Use it for joints wider than ⅛ inch. Unsanded grout has no sand, making it smoother and less likely to scratch delicate tiles like marble or glass. Use unsanded grout for joints ⅛ inch or narrower. Using sanded grout in narrow joints prevents full packing (the sand grains do not fit), and using unsanded grout in wide joints causes shrinkage cracks as the cement cures. The adhesive-and-grout interaction guide covers how adhesive and grout choices interact for different tile formats.
- How long after tiling can I apply grout?
Wait at least 24 hours after setting tiles before grouting. The thinset mortar beneath the tiles needs time to cure and develop bond strength. Grouting too soon can shift tiles that have not fully bonded, and the excess moisture from grout mixing can interfere with thinset curing. In cold or humid conditions, extend the wait to 48 hours. If you can press on a tile and it moves at all, the thinset is not ready for grouting.
- Do I need to seal grout after installation?
Yes, for cement-based grout (both sanded and unsanded). Cement grout is porous and absorbs stains, moisture, and bacteria without a sealer. Apply a penetrating sealer 72 hours after grouting, once the grout has fully cured. Reapply sealer every 1–3 years depending on traffic and exposure. Epoxy grout does not need sealing because the resin matrix is non-porous — stains, water, and bacteria cannot penetrate the surface. In wet areas like showers, pair sealed grout with a proper waterproofing membrane behind the tile for lasting protection.
- How much extra grout should I buy for waste?
Add 10% to your calculated quantity for standard waste from mixing, float scraping, and sponge cleaning. For mosaic tile installations, increase to 15% because the high joint-to-tile ratio means more grout gets wiped away during cleaning. For your first grouting project, add 20% to account for learning — uneven application, re-packing joints, and slower cleaning speed all increase consumption. Most retailers accept returns on unopened bags within 90 days. If you have not estimated adhesive yet, the thinset/mastic/epoxy tool handles thinset, mastic, and epoxy quantities for the same project.
More Materials calculators
Browse all materials calculators — Paint coverage, roofing bundles, tile adhesive, welding time, parking lot sizing, and more.