Cabinet Paint Calculator
Refinishing kitchen cabinets? Use this cabinet paint calculator to estimate paint, primer, and supply quantities from door count, size, and finish type.
Last updated:
Reviewed by Doc. dr. sc. Mladenka Juradin, dipl. ing. građ., PhD, Civil Engineering (FCEAG, University of Split)
Count every hinged door. Double doors on a single opening count as 2.
Count each visible drawer face. Pull-out shelves with a false front count as 1.
Measure from top to bottom of a typical door. Upper and lower doors often differ — use the average.
Measure the full door width including any overlay past the frame.
Exteriors include visible end panels and face frames. Interiors add shelves and inside walls.
Spraying uses more paint due to overspray but produces a smoother factory-like finish.
How This Is Calculated
Door area = door count × height × width × 2 sides ÷ 144. Drawer area = drawer count × 6 in × width × 2 sides ÷ 144. Box area = door count × 2.5 sq ft (exterior) or 5 sq ft (interior + exterior). Total area = doors + drawers + boxes. Paint quarts = ceil(total area × 2 coats ÷ coverage rate × 4). Primer quarts = ceil(total area ÷ 350 × 4). Supplies = $100 base + $5 per door + $50 if spraying.
Source: Cabinet surface area calculations per KCMA (Kitchen Cabinet Manufacturers Association) standard cabinet dimensions. Paint coverage rates from Benjamin Moore Advance and Sherwin-Williams ProClassic product specifications (350-400 sq ft per gallon on smooth surfaces). Primer coverage per Zinsser product data sheets.
8 min read
Doors, Drawers, and Boxes: The Surface Area Math
Painting kitchen cabinets costs $200-$600 in materials and delivers a visual transformation that rivals a $8,000-$15,000 full cabinet replacement. That ratio — roughly 3-5% of replacement cost for 80% of the visual impact — is why cabinet painting ranks as the highest-ROI kitchen upgrade in every remodelling survey since 2018.
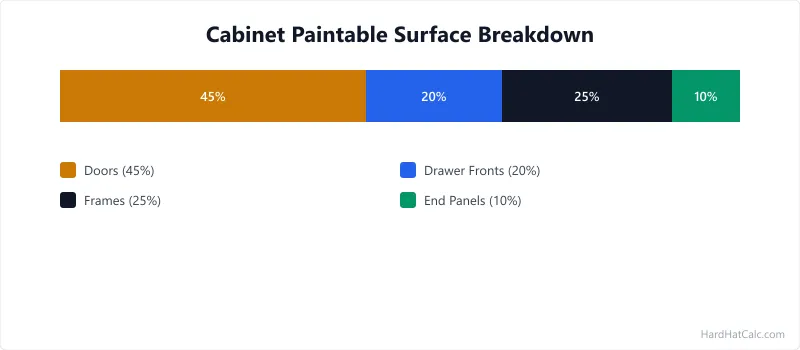
The surface area calculation behind this tool breaks the project into three zones, each with different coverage characteristics.
Door and drawer fronts (both sides). Every door gets painted front and back. The front is the visible face; the back faces the cabinet interior and needs paint too, both for a finished look when the door is open and to prevent moisture imbalance that causes warping. The calculator uses your actual door measurements — height times width times two sides — then converts from square inches to square feet by dividing by 144.
Drawer fronts follow the same logic with a fixed height. Standard drawer fronts run about 6 inches tall regardless of width. The calculator multiplies drawer count by 6 inches by your door width by two sides. If your drawers are taller than 6 inches (deep pot drawers, for example), add a door equivalent for each oversized drawer.
Cabinet boxes add area based on scope. Painting box exteriors adds roughly 2.5 square feet per cabinet for visible end panels and face frames. If you include interiors — shelves, inside walls, the underside of the top panel — that doubles to about 5 square feet per cabinet. Interior painting is optional but makes a dramatic difference on open-shelf or glass-door cabinets.
Coverage rates split by application method. Brush and roll delivers about 350 square feet per gallon on the smooth, sealed surfaces typical of factory-finished cabinets. Spray application drops to 280 square feet per gallon because of overspray — paint that drifts past the target surface and settles on masking, drop cloths, and the air. Two coats of paint over one coat of bonding primer is the standard build for cabinet refinishing.
Prep, Primer, and Topcoat: What Each Step Demands
Cabinet painting fails more often from bad prep than from bad paint. The factory finish on most kitchen cabinets — whether thermofoil, catalysed lacquer, or baked enamel — is designed to resist adhesion. Paint applied over a slick factory surface without proper preparation peels within months, sometimes within weeks. The prep sequence matters more than the brand of paint you choose.
Start by removing every door, drawer front, and piece of hardware. Label each piece with painter's tape and a number so it goes back in the right position — cabinet openings are rarely identical, even when they look it. A smartphone photo of the numbered layout saves hours of trial-and-error during reinstallation.
Deglossing is the critical step most DIY painters underestimate. Liquid deglosser (Krud Kutter or equivalent, about $12 per bottle) chemically etches the factory finish to create a surface profile that primer can grip. Wipe it on with a lint-free cloth, let it sit for the manufacturer's specified dwell time, and do not rinse unless the label says to. Follow deglossing with a light scuff sand using 220-grit sandpaper — the goal is surface texture, not material removal. Skip this combination and the bonding primer has nothing to grab onto.
Primer selection is non-negotiable for cabinets. A standard latex primer will fail on factory-finished cabinets. Shellac-based primers (Zinsser BIN is the industry standard) bond to virtually anything including thermofoil, melamine, and old lacquer. They dry in 45 minutes, sand easily, and block bleed-through from wood tannins and old stains. The trade-off is strong odour and solvent cleanup — use shellac primer in a well-ventilated space or outdoors. Water-based bonding primers (Stix by Insl-x, Zinsser 123 Plus) are lower-odour alternatives that work on most cabinet surfaces, though shellac remains the safer choice on unknown or glossy finishes.
For topcoat, cabinet-grade alkyd-hybrid paints outperform standard latex. Benjamin Moore Advance and Sherwin-Williams ProClassic are the two most widely recommended products in the cabinet painting trade. Both self-level to a smooth finish that minimises brush marks, cure to a hard, washable film over 7-14 days, and resist the fingerprints and grease that destroy standard wall paint on kitchen surfaces. They cost $18-$22 per quart as of March 2026 — roughly twice the price of commodity wall paint, but the performance difference on high-touch kitchen surfaces justifies the premium. If you are also mixing multi-component coatings for other projects, the paint ratio calculator handles hardener and reducer volumes for two-part systems.
Brush vs. Spray: Side-by-Side Comparison
The finish method you choose affects material quantity, cost, skill requirements, and final appearance. The table below compares brush-and-roll against spray application across every factor that matters for a cabinet painting project. Prices as of March 2026, US national averages.
| Factor | Brush & Roll | Spray (HVLP or Airless) |
|---|---|---|
| Coverage rate | 350 sq ft/gal | 280 sq ft/gal |
| Paint waste | 5-10% (drips, roller tray) | 20-35% (overspray) |
| Finish quality | Good — minor brush or stipple texture visible | Excellent — smooth, factory-like appearance |
| Skill level | Beginner-friendly with foam rollers | Intermediate — requires practice on test pieces |
| Prep masking | Minimal — tape edges, drop cloths | Extensive — mask everything within 10 ft of spray area |
| Equipment cost | $30 (brushes + foam rollers) | $50-$80 (rental or disposable HVLP gun) |
| Time per coat | 3-5 hours for a 16-door kitchen | 1-2 hours for a 16-door kitchen |
| Cleanup | Soap and water (for latex hybrid paints) | Gun cleaning, overspray removal |
| Best for | Small projects, tight budgets, first-timers | Full kitchens, perfectionists, experienced painters |
Spraying is faster per coat but the masking prep adds 2-4 hours upfront. For a standard 16-door kitchen, total project time is roughly equal between methods. The real difference is finish quality — sprayed cabinets look like they came from a factory, while brushed cabinets show subtle texture that ranges from "charming" to "sloppy" depending on technique.
A hybrid approach works well for many projects: spray the door fronts and drawer faces (where the smooth finish matters most), then brush and roll the cabinet boxes and face frames (where slight texture is less noticeable and masking for spray would be tedious). This cuts masking time in half while putting the best finish on the most visible surfaces.
Peeling, Sticky Doors, and Other Cabinet Paint Failures
Cabinet painting failures fall into predictable categories, and most are preventable with knowledge rather than skill. Understanding where projects go wrong is more valuable than memorising paint brands.
Peeling within 3 months is almost always a prep failure. Either the deglosser was skipped, the scuff sand was too light, or a standard latex primer was used instead of a bonding primer. The fix is brutal: strip everything back to bare wood or factory finish and start over. There is no shortcut that saves a peeling cabinet job.
Sticky doors that never fully harden happen when the paint is not allowed to cure. Alkyd-hybrid cabinet paints like Benjamin Moore Advance feel dry to the touch in 16-24 hours but take 7-14 days to reach full hardness. Reinstalling doors before the paint cures means the door edges press against the face frame and bond to each other. When you open the door, the paint tears. The fix: wait the full cure time. Prop doors flat on painter's pyramids (small plastic points, about $8 for a pack of 10) so air circulates around all surfaces. Do not stack doors during curing.
Visible brush marks on door faces result from using the wrong applicator or working too slowly. Foam mini-rollers (4-inch, high-density foam) produce a smoother finish than bristle brushes on flat door panels. Roll the paint on, then "tip off" with a single light brush stroke to level the surface. Work fast enough that the wet edge stays workable — alkyd hybrids start to tack up within 10-15 minutes in warm conditions.
Colour mismatch between doors and boxes happens when the doors get more coats than the boxes, or when different application methods produce different film builds. Two sprayed coats on a door look different from two brushed coats on the face frame, even with the same paint from the same can. The fix: apply the same number of coats with the same method to all visible surfaces, or accept a slight variation and keep the boxes one shade darker intentionally. Planning new cabinets from scratch instead of refinishing? The cabinetry material calculator estimates plywood sheets, hardware, and edgebanding for a complete build. If the kitchen remodel also involves removing or modifying a wall, verify whether it is load-bearing before touching the framing — a structural change above the cabinets changes everything about how the uppers are supported.
Drying Times and Recoat Windows
Getting the timing right between coats is one of the subtler challenges in cabinet painting. Too soon and the coats fuse into a soft, gummy layer. Too late and the new coat cannot bond properly to the cured surface underneath.
Primer to first topcoat: Shellac-based primer (Zinsser BIN) dries to sand in 45 minutes. Scuff lightly with 320-grit sandpaper to knock down any nibs or dust, wipe with a tack cloth, and apply the first topcoat within 24 hours. Water-based bonding primers need 1-2 hours before sanding and topcoating.
Between topcoats: Alkyd-hybrid paints require 16-24 hours between coats at 70 deg F and 50% relative humidity. Higher humidity or lower temperature extends this — in a cool garage, allow 36 hours. Check by pressing a fingertip to an inconspicuous area. If the paint feels cool or leaves a fingerprint, wait longer. Applying the second coat over a tacky first coat traps solvents that prevent proper cure and cause the finish to remain permanently soft.
Final cure before reassembly: This is the step DIY painters rush and regret. Full cure takes 7-14 days for alkyd hybrids, 21-30 days for waterborne acrylics. During this period, the paint hardens from a flexible film to a durable shell. Reinstalling doors early risks every contact point becoming a damage point. Plan to live without cabinet doors for at least a week — cook simple meals, use shelf liners on the open shelves, and resist the urge to "just put a couple back" early. For whole-room projects that include painting walls and ceilings beyond the cabinets, a full house painting cost estimate helps budget the broader scope.
Temperature and ventilation directly affect cure time. A warm, dry room with airflow cures paint fastest. In winter, run the kitchen heating to maintain at least 65 deg F and crack a window for VOC ventilation. A box fan on low pointed at the drying doors accelerates solvent evaporation without depositing dust.
Worked Examples
Example 1
Scenario: A homeowner is refinishing a standard kitchen with 16 cabinet doors (24" × 14" each), 8 drawer fronts, box exteriors only, using a spray finish.
Calculation: Door area = 16 × 24 × 14 × 2 ÷ 144 = 74.67 sq ft. Drawer area = 8 × 6 × 14 × 2 ÷ 144 = 9.33 sq ft. Box area = 16 × 2.5 = 40 sq ft. Total paintable area = 74.67 + 9.33 + 40 = 124 sq ft. Paint gallons = 124 × 2 ÷ 280 = 0.886 gallons → 0.886 × 4 = 3.54 → 4 quarts. Primer quarts = 124 ÷ 350 × 4 = 1.42 → 2 quarts. Paint cost = 4 × $20 = $80. Primer cost = 2 × $14 = $28. Supplies = $100 + (16 × $5) + $50 spray = $230. Total = $80 + $28 + $230 = $338.
What this means: Four quarts of cabinet-grade paint and two quarts of bonding primer cover a 16-door kitchen with spray application. The material cost of $338 is a fraction of the $5,000-$15,000 professional cabinet painting quote — though a pro job includes labour, setup, and warranty.
Takeaway: Spray finishing uses roughly 20% more paint than brush and roll because of overspray, but the smooth factory-like result is why most kitchen repaints now use HVLP or airless sprayers.
Example 2
Scenario: A homeowner is painting a small bathroom vanity with 2 doors (20" × 14" each) and 3 drawer fronts, box exteriors only, using brush and roll.
Calculation: Door area = 2 × 20 × 14 × 2 ÷ 144 = 7.78 sq ft. Drawer area = 3 × 6 × 14 × 2 ÷ 144 = 3.50 sq ft. Box area = 2 × 2.5 = 5 sq ft. Total paintable area = 7.78 + 3.50 + 5 = 16.28 sq ft. Paint gallons = 16.28 × 2 ÷ 350 = 0.093 gallons → 0.093 × 4 = 0.37 → 1 quart. Primer quarts = 16.28 ÷ 350 × 4 = 0.19 → 1 quart. Paint cost = 1 × $20 = $20. Primer cost = 1 × $14 = $14. Supplies = $100 + (2 × $5) = $110. Total = $20 + $14 + $110 = $144.
What this means: A single quart each of paint and primer covers a small bathroom vanity with plenty to spare. The supplies cost ($110) dominates the total because you need the same deglosser, sandpaper, tape, and brushes regardless of how few doors you are painting.
Takeaway: For small projects like a vanity, supplies outweigh paint cost by 5:1. If you already own brushes, rollers, and sandpaper from a previous project, the actual spend drops to under $50 in consumables.
Frequently Asked Questions
- How many quarts of paint do I need for 16 kitchen cabinet doors?
For 16 standard-size doors (24" x 14") with 8 drawer fronts and box exteriors, plan for 3-4 quarts of cabinet-grade paint and 2 quarts of bonding primer. Brush-and-roll application uses less paint (about 3 quarts at 350 sq ft per gallon coverage) while spray finishing needs closer to 4 quarts because overspray reduces effective coverage to about 280 sq ft per gallon. Buy an extra quart for touch-ups after reassembly — hinge areas and edges get nicked during reinstallation more often than you expect. The paint coverage rates guide has more detail on how surface texture affects per-gallon yields.
- Should I spray or brush paint kitchen cabinets?
Spraying produces a smoother, factory-like finish with no brush marks, making it the preferred method for visible door faces and drawer fronts. However, it requires extensive masking (everything within 10 feet of the spray area), an HVLP or airless sprayer ($50-$80 to rent), and practice to avoid runs and drips on vertical surfaces. Brush-and-roll is more forgiving for beginners, needs minimal masking, and works well for cabinet boxes and face frames where slight texture is less noticeable. Many professionals use a hybrid approach: spray the doors and drawer faces for the smoothest finish, then brush and roll the boxes. If you are mixing two-part finishes, the paint ratio calculator handles hardener and reducer volumes.
- Do I need to prime cabinets before painting if they are already finished?
Yes — priming is non-negotiable on factory-finished cabinets. The existing finish, whether thermofoil, catalysed lacquer, or baked enamel, is engineered to resist adhesion. A bonding primer (shellac-based like Zinsser BIN or water-based like Stix by Insl-x) chemically grips slick surfaces that standard latex primer cannot. Skipping the primer is the single most common cause of cabinet paint peeling within the first 3-6 months. Even if the factory finish looks dull or worn, it still has enough surface hardness to reject direct topcoat adhesion. If you are building new cabinets rather than refinishing, the cabinetry material calculator estimates plywood and hardware before you get to the paint stage.
- How long does it take to paint kitchen cabinets from start to finish?
A standard 16-door kitchen takes 3-5 full days of active work spread across 2-3 weekends, plus 7-14 days of cure time before reinstalling doors. Day 1 covers removal, labelling, deglossing, and sanding. Day 2 is primer application and sanding. Days 3-4 handle the two topcoats with an overnight dry between them. Day 5 is reassembly and hardware installation. The multi-weekend schedule is not about the amount of work — it is about respecting dry times between coats. Rushing the timeline by applying coats too soon produces a soft finish that never fully hardens. While doors cure, tackle the ceiling paint so drips do not land on finished cabinets.
More Materials calculators
Browse all materials calculators — Paint coverage, roofing bundles, tile adhesive, welding time, parking lot sizing, and more.