Shed Foundation Calculator
Shed foundation calculator comparing pier blocks, gravel pads, and concrete slabs. Enter shed size and soil type for material quantities and cost by type.
Last updated:
Reviewed by Doc. dr. sc. Mladenka Juradin, dipl. ing. građ., PhD, Civil Engineering (FCEAG, University of Split)
Exterior dimension of the shed.
Pier blocks for light storage, gravel for mid-range, concrete for workshops.
Soil bearing capacity affects pier spacing and drainage requirements.
For estimation only. Structural work requires review by a licensed engineer. Local building codes take precedence over any calculator output.
How This Is Calculated
Foundation area = shed length x shed width. Pier blocks: grid at 6 ft OC, piers per axis = ceil(dimension / 6) + 1, total piers = length piers x width piers, gravel = 0.037 cu yd per pier, cost = (piers x $12) + (gravel x $35/cu yd). Gravel pad: volume = (length + 2) × (width + 2) × 0.5 ft / 27 cu yd, cost = (volume x $35) + (pad area x $0.20 fabric) + $50 delivery. Concrete slab: volume = length x width x 0.333 ft / 27, cost = (volume x $160/cu yd) + (area x $0.50 mesh) + (area x $4.50 forming/finishing).
Source: Foundation sizing follows IRC 2021 Section R403 (Footings) and Table R401.4.1 (Presumptive Load-Bearing Soil Values). Concrete volume calculations per ACI 332-14 (Residential Code Requirements for Structural Concrete).
7 min read
Why Your Shed Needs a Proper Foundation
A shed without a proper foundation is a shed with a countdown timer. Bare soil contact invites moisture into the floor framing, accelerates rot in pressure-treated lumber, and lets frost heave tilt the entire structure over a few seasons. Even a $500 prefab shed deserves a $120 pier block foundation that takes a few hours to install.
What happens when you skip the foundation? Three failure modes account for most shed problems. First, ground moisture wicks into the floor joists through direct soil contact, and even pressure-treated lumber degrades faster when it sits in perpetually damp conditions. Second, frost heave — the expansion of moisture in the soil during freeze-thaw cycles — pushes unevenly against whatever sits on top of it. A shed without piers or a gravel drainage layer can shift two to three inches in a single winter, racking door frames and cracking siding. Third, settling on unstable soil (especially clay) creates a gradual lean that worsens each year as the heavy side compresses the soil further.
Does every shed need a foundation? Technically, a very small shed (under 64 sq ft) on well-drained gravel soil can sit on landscape timbers laid directly on grade. But "can" and "should" diverge quickly. Landscape timbers rot within five to seven years in ground contact, and by the time you notice, the shed floor is compromised. A set of pier blocks costs under $100 for a small shed and eliminates all three failure modes. That is cheap insurance.
What about frost depth requirements? In cold climates, foundations must extend below the frost line to prevent heave. For most shed applications, pier blocks sitting on a 12-inch gravel pad satisfy this requirement because the gravel drains water away from the pier base before it can freeze and expand. For permanent structures or sheds over 200 sq ft in cold regions, check your local frost depth requirement per IRC R403.1.4 — it ranges from 12 inches in the mid-Atlantic states to 48 inches or more in Minnesota and Maine per local jurisdiction frost depth maps.
Pier Blocks vs. Gravel Pad vs. Concrete Slab
Choosing the right foundation type depends on three factors: what the shed will hold, how permanent you want the structure to be, and how much you want to spend.
Pier blocks are precast concrete blocks (typically 8" x 16" x 10" tall) with a notched top that accepts a 4x4 or 4x6 post or beam. They cost $8-$15 each, require no concrete mixing, and go in within an afternoon. Set them on a bed of compacted gravel, level them with a string line, and build your floor frame on top. Pier blocks work well for storage sheds under 200 sq ft where the load is light and the contents are not sensitive to minor floor flex. The downside: they do not create an enclosed floor, so rodents can access the underside, and the shed sits 8-12 inches above grade, requiring a ramp for wheeled equipment.
Gravel pads create a level, well-drained surface for the entire shed footprint. You excavate 6-8 inches, lay landscape fabric, and fill with compacted 3/4-inch crushed stone. The shed floor frame sits directly on the gravel or on pressure-treated skids. Gravel pads cost more than pier blocks ($200-$500 for a 10x12 shed) but provide better drainage, a more level surface, and a cleaner look. They work well for mid-size sheds up to 300 sq ft.
Concrete slabs are the premium option. A 4-inch slab with welded wire mesh reinforcement provides a permanent, level floor that handles any load. Workshops, garages, and sheds storing heavy equipment need a slab. The cost is substantially higher — $800-$2,000 or more for a 12x16 shed — and you need to wait 3-7 days for curing before building on it. The mix itself also varies with the foundation type. A 4-inch slab uses a different proportion than a pier footing, and matching the concrete mix to the foundation type walks through ACI 211 recommendations for slabs, piers, and footings side by side. If you go the concrete route and the slab needs reinforcement, you can work out rebar quantities for your slab dimensions.
A general rule: pier blocks for basic storage, gravel for sheds that need drainage and a clean appearance, concrete for workshops and any structure you want to last 30+ years.
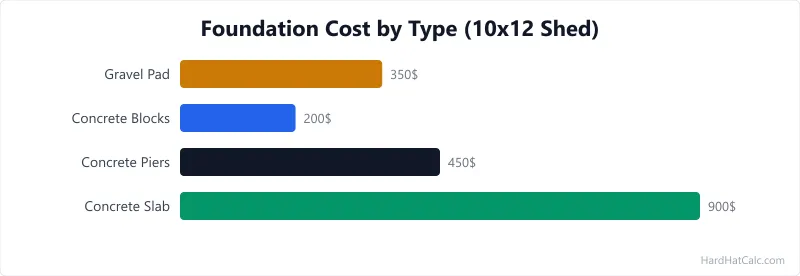
Material Costs by Foundation Type
Foundation costs vary widely depending on the type, size, and whether you do the work yourself or hire it out. The table below covers DIY material costs for a typical 10x12 shed as of March 2026.
| Foundation Type | Materials Needed | Cost Range (March 2026) | Difficulty | Time |
|---|---|---|---|---|
| Pier Blocks | 6-12 blocks, gravel, string line | $80-$200 | Easy — no special tools | 2-4 hours |
| Gravel Pad | 3-5 cu yd crushed stone, landscape fabric, edging | $200-$500 | Moderate — excavation required | 4-8 hours |
| Concrete Slab | 1.5-3 cu yd ready-mix, wire mesh, forms, stakes | $800-$2,000 | Hard — forming and finishing skill needed | 1-2 days + cure time |
Prices as of March 2026, US national averages. Labour not included — hiring a contractor adds 50-100% to the material cost for gravel and concrete options. Pier blocks are straightforward enough that most DIYers handle them without help.
Delivery adds $50-$150 depending on distance and quantity. Ready-mix concrete requires a minimum order (usually 1 cu yd) and charges a short-load fee for orders under 3-4 cu yd — typically $30-$50 per cu yd below the minimum.
Soil Type and Drainage Considerations
Different soils handle shed weight differently, and ignoring soil conditions is the second most common shed foundation mistake after skipping the foundation entirely.
Clay soil is the most problematic. It expands when wet and shrinks when dry, creating a cycle of heave and settlement that can shift pier blocks several inches over a few seasons. Clay also drains poorly — water sits around the foundation instead of draining away, which accelerates rot and increases frost heave risk. If you are building on clay, a gravel pad is usually the minimum acceptable foundation because the crushed stone creates a drainage layer that clay alone cannot provide. For larger sheds on clay, a concrete slab with a 4-inch gravel sub-base is the safest option.
Sandy soil drains well but offers less bearing capacity than clay. Pier blocks on sand can shift laterally under load unless the base gravel is well compacted. For projects where the pier footing needs precise sizing for heavy loads, pier-and-pad sizing handles the soil bearing capacity math.
Gravel is the ideal natural bearing material for shed foundations. It drains freely, resists frost heave, compacts well, and provides consistent bearing capacity. If your site has natural gravel soil, pier blocks or a gravel pad placed directly on the native soil (after removing topsoil) work reliably.
Regardless of soil type, grade the site so the ground slopes away from the shed at a minimum of 1 inch per foot for the first 6 feet. Standing water against the foundation — any foundation — shortens the lifespan of the structure. A 15-minute grading job with a rake prevents years of moisture problems. If grading involves heavy cut-and-fill work, the cubic-yard cut-and-fill tool helps estimate how much material you need to cut or fill.
Building Your Shed Foundation: Step by Step
These steps apply to all three foundation types. Adapt the middle steps to your chosen method.
Check local codes and setback requirements. Most jurisdictions allow sheds under 120-200 sq ft without a permit, but setback rules (distance from property lines, septic systems, and other structures) apply regardless of size. A five-minute call to your local building department prevents costly surprises. Some HOAs have additional restrictions on shed size, placement, and appearance.
Mark and level the site. Use stakes and string to outline the foundation footprint. Check for square by measuring diagonals — they should be equal within 1/4 inch. Use a line level or laser level to establish the grade across the site. For sloped sites, you will need to excavate the high side or build up the low side with additional gravel.
Call 811 before digging. Underground utility lines (gas, electric, water, cable) can cause serious injury or death if struck during excavation. This free service marks buried utilities within 48–72 hours.
Excavate to the right depth. For pier blocks: dig individual holes 12 inches deep and 18 inches square at each pier location. For gravel pads: strip topsoil and excavate 6-8 inches across the entire pad area plus 1 foot on each side. For concrete slabs: excavate 8-10 inches (4 inches gravel sub-base + 4 inches concrete) across the slab footprint.
Lay drainage gravel and compact. Every foundation type benefits from a gravel base. Use 3/4-inch crushed stone (not round pea gravel, which does not compact well). Compact in 3-inch lifts with a hand tamper or plate compactor. For gravel pads, lay landscape fabric under the gravel to prevent soil migration.
Set your foundation elements and verify level. For pier blocks: place blocks on the compacted gravel, level each one individually, then level across the grid with a long straight edge and laser level. For gravel pads: screed the final gravel layer flat with a 2x4. For concrete slabs: set forms, verify they are level and square, then pour and finish the concrete.
Build the floor frame or wait for cure. Once your foundation is in place, the shed roof truss calculator helps you plan the roof structure. For pier and gravel foundations, build a pressure-treated floor frame (typically 2x6 or 2x8 joists at 16 inches OC) immediately. For concrete slabs, wait a minimum of 3 days (7 days in cold weather) before placing any load on the slab.
Worked Examples
Example 1
Scenario: A homeowner is building a 10x12 garden shed on pier blocks in sandy soil. The shed will store lawn equipment and hand tools — no heavy machinery.
Calculation: Pier grid: piers along length = ⌈12/6⌉ + 1 = 3. Piers along width = ⌈10/6⌉ + 1 = 3. Total piers = 3 × 3 = 9. Gravel per pier = 1 cu ft, total = 9 cu ft = 0.33 cu yd. Cost = (9 piers x $12) + (0.33 cu yd x $35) = $108 + $11.55 = $119.55.
What this means: A pier block foundation for this size shed costs roughly $120 — a fraction of a concrete slab. The trade-off is that pier blocks do not provide a floor; you build a pressure-treated floor frame on top of the piers. For a basic storage shed, that floor frame adds $150-$250 in lumber.
Takeaway: For sheds under 150 sq ft used for storage, pier blocks are the most cost-effective foundation. The entire installation goes in within an afternoon with no concrete work, no forms, and no curing time.
Example 2
Scenario: A homeowner is pouring a 12x16 concrete slab for a workshop shed that will house a table saw, drill press, and air compressor.
Calculation: Foundation area = 12 × 16 = 192 sq ft. Slab thickness = 4 inches = 0.333 ft. Concrete volume = (12 × 16 × 0.333) / 27 = 2.37 cu yd. Welded wire mesh = 192 sq ft x $0.50 = $96. Forming and finishing = 192 sq ft x $4.50 = $864. Concrete = 2.37 cu yd x $160 = $379.20. Total = $379.20 + $96 + $864 = $1,339.20.
What this means: A concrete slab costs roughly ten times more than pier blocks for a similar footprint, but it provides a durable, level floor that handles equipment loads, can be swept clean, and lasts the lifetime of the structure. The forming and finishing labour accounts for nearly 65% of the total cost.
Takeaway: For workshop sheds where you will store heavy tools, a vehicle, or equipment — or where the shed will eventually have electricity and climate control — the slab investment pays off. Pier block foundations are not designed for concentrated loads from heavy machinery.
Frequently Asked Questions
- What is the best foundation type for a 10x12 storage shed?
Pier blocks are the best foundation for a standard 10x12 storage shed in most situations. Nine pier blocks in a 3x3 grid cost under $120 in materials, install in an afternoon, and provide adequate support for a shed holding lawn equipment, tools, and seasonal items. A gravel pad is worth the extra $150-$300 if your soil is clay or drains poorly, because it prevents the moisture buildup that causes pier blocks to shift. A concrete slab is overkill for a basic storage shed — save that investment for a workshop or a shed that will hold heavy equipment. Once the foundation is in, plan the roof with the shed roof truss calculator to get a complete lumber order for the build.
- Do I need a concrete slab for a shed or will pier blocks work?
Pier blocks work for storage sheds under 200 sq ft with moderate loads. They cannot support concentrated heavy loads like a vehicle, large machinery, or a fully stocked workshop. A concrete slab is necessary when the shed will serve as a workshop with heavy stationary tools, when you want a smooth and sweepable floor, or when the shed will be a permanent structure with electricity and climate control. Pier blocks also leave the underside of the shed open, which some jurisdictions require enclosing with skirting for code compliance. If you go with a slab, rebar mat spacing sizes the steel grid for your slab dimensions.
- How deep should shed foundation piers be in cold climates?
In cold climates, shed foundation piers should sit on a gravel base that extends below the frost line to prevent frost heave. Frost depth varies from 12 inches in mild-winter areas (mid-Atlantic, Pacific Northwest) to 48 inches or more in northern states (Minnesota, Maine, Montana) per IRC R403.1.4 and local jurisdiction frost depth maps. IRC Section R403.1.4.1 specifies that footings must extend below the frost line unless the structure qualifies for an exemption. For most residential sheds, setting pier blocks on a 12-inch compacted gravel pad satisfies frost requirements because the gravel drains water away before it can freeze and expand against the pier. For projects that need precisely sized poured piers, you can work out pier dimensions using the soil bearing capacity math.
- Does a shed foundation need a building permit?
Building permit requirements for sheds vary by jurisdiction, and there is no single national rule. Most municipalities exempt sheds under 120-200 sq ft from permit requirements, but setback rules (distance from property lines, easements, and septic systems) still apply regardless of shed size. Some jurisdictions require permits for any structure with a concrete foundation, even if the shed itself is exempt. Checking with your local building department is free and takes about five minutes — a permit for a small shed typically costs $25-$75 and prevents the much larger cost of having to move or modify a non-compliant structure.
- How much gravel do I need under a shed pad?
Calculate gravel volume by adding 2 feet to both the length and width of the shed (1-foot overhang on each side for drainage), then multiplying by the pad depth in feet and dividing by 27 to convert to cubic yards. For a 10x12 shed with a 6-inch gravel pad: (12 + 2) × (10 + 2) × 0.5 / 27 = 3.11 cu yd. Order 3.5 cu yd to account for compaction loss (gravel compresses roughly 10-15% when tamped). At $35-$45 per cubic yard delivered, the gravel for a 10x12 pad runs $110-$160. Use 3/4-inch crushed stone, not round pea gravel — crushed stone interlocks when compacted and provides a stable, level surface. If the site needs grading first, the dirt-volume estimator estimates how much soil to cut or fill.
More Structural calculators
Browse all structural calculators — Beam sizing, truss pricing, load calculations, wall framing, deck capacity, and foundation tools.